
Chunk 3, Module 1: Object-Oriented Java
Exploring object design by modeling real-world (doughy) objects
Programmers solve technical problems in Java by creating and manipulating Java objects. Bruce Eckel, an extraordinary programming teacher and writer of our recommended text, describes an object like a fancy variable that can store multiple named chunks of data (called member variables) and also store Java code that manipulates that data.
To keep our introduction to Java objects gastronomically rich, this module will guide you through modeling a donut in code, creating instances of those donuts, and feeding those donuts to robotic dogs.
prerequisites |
Confidence with our Chunk 1 and Chunk 2 modules will greatly aid your learning and synthesizing those core concepts. |
|
This is a motorcycleExercise 1: "Might we be friends?" flowcharting activity paragraph This is a paragraph |
We have created and used several handy objects thus far in the course like our Scanner and Random objects. When we write The blueprints (the actual java code organized into a class
arrow_downwardJump to a section
local_diningModule "hamburger" guide
check_boxLearning Objectives
bookModule Prep and Recommended Readings
extensionCore Concepts: Making Donut Objects
motorcycleExercise 3: Creating a RoboDog class
motorcycleExplore Further 1: Robot dogs like donuts too!
motorcycleExplore Further 2: Refactor DogLand to work through methods
motorcycleExercise 4: Create a variable power supply class
local_dining
Module Hamburger Guide
Print off the hamburger guide for this module, review it carefully, and complete its sections as a culminating activity for this module.
Hamburger For Printing (*.pdf)
Editable Hamburger (open document text *.odt)
Module Learning Objectives
| check_box | Explain in English how object-oriented programming is different from procedural programming (the kind we've done in class up to this point). |
|---|---|
| check_box | Write a Java class that creates objects which model real-life donuts. |
| check_box | Write Java code outside our Donut class that sets and gets properties on our Donut objects. |
| check_box | Write Java code outside of our Donut class that uses methods to assemble useful information about a set of Donut objects. |
book
Module Prep and Recommended Readings
Bruce Eckel's book, Thinking In Java, is one that introduces objects right away, so you're ready for his book. It's all online, for free.
His writing is geared toward explanation rather than lots of short examples that can be understood very quickly. If you are only going to read one chapter, read chapter 2, Everythin gis an Object.
Oracle Press: Java A Beginner's Edition: Chapter 4 - Introducing Classes, Objects, and Methods
extension
Module Core Concepts
Step 1: Setup NetBeans for the module
We need to do the following to preapre for learning about objects:
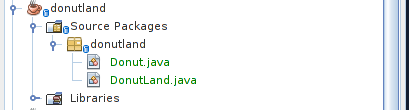
- Create a new project of type Java Application called donutland. Note the capitalization!
- Inside this project's Source Packages, create a package also called donutland. Do this by right clicking on "Source Packages" >> New >> Java Package.
- Now, create two Java classes inside the package donutland called Donut and DonutLand. Do this by right clicking on the package donutland >> New >> Java Class
Your NetBeans project structure should look like this (but the class names won't be green):
Step 2: Creating a Donut blueprint
Java Classes are blueprints for creating "objects" in code. Every object made from the same Class contains all the member variables and methods declared in the Class code (i.e. the blueprint).
We're going to learn about how to make java Objects by modeling an actual object: a donut! Our blueprint for the donuts we're going to make is the class Donut. We find this blueprint wandering aimlessly around Donutland, having never been used to make a new Donut:
Figure 1: Blueprint for a Donut class in DonutLand
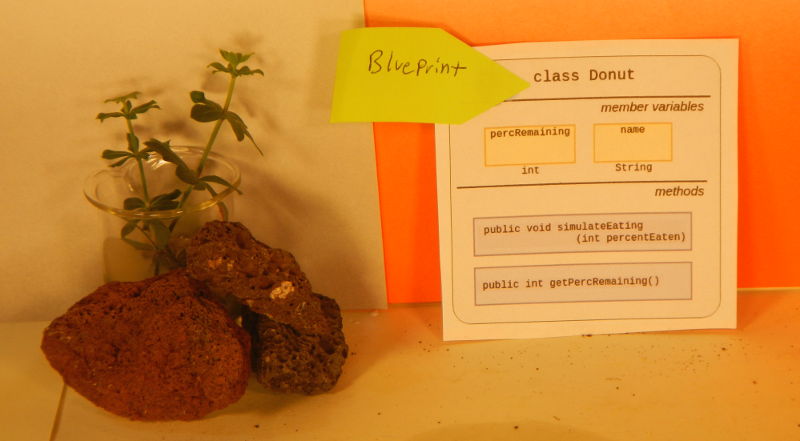
Classes act as blueprints for creating Objects in Java. Here in DonutLand, we can see that we have a blueprint for a Donut object that contains two member variables, and two methods.
You can see this familiar Class layout in the blueprint. It says that if we make a Donut object using this blueprint, its class name is Donut, it will have two member variables: percRemaining as type int, and name as type String.
No more static!
Note that there are no values in our member variables yet: it's just a blueprint. We have to have a new instance of an object to store values to the member variables. This is why we don't use the keyword static anymore! Member variables and methods that are used like blueprints for making Objects are not static. When the keyword static is not used for a member variable or method, the Java compiler waits to create them in memory until the object is instantiated (made into an Object).
Our blueprint in Java code
Our box-model of the Donut object corresponds to the following Java code. Study this carefully and see how the two realte.
Figure 2: class Donut
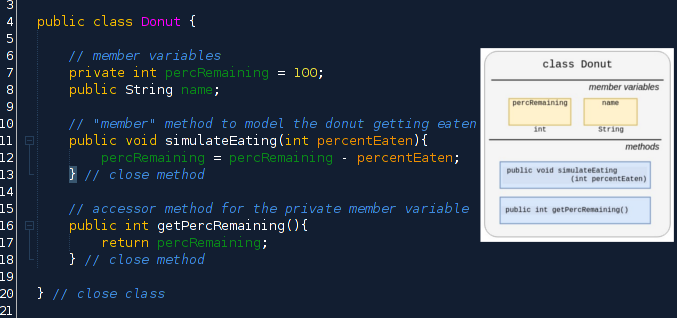
This Java class acts as a blueprint for creating Donut objects, which are stored in memory.
We'll make a Donut by using the keyword new.
No main() method in blueprint classes
Since this class acts as a blueprint, not as a self-contained application, there is no main() method. Instead, we have to use this blueprint in a larger application that includes a class that does have a main() method.
Step 3: Creating DonutLand
Since Donut exists as its own class, we need another class which we'll call DonutLand that will have a main() method which will coordinate all the making and eating of Donuts. Create this class in Netbeans. Think of it like a class that acts as the little world in which Donuts exist.
Create this skeleton in the DonutLand class:
Figure: Creating a DonutLand class
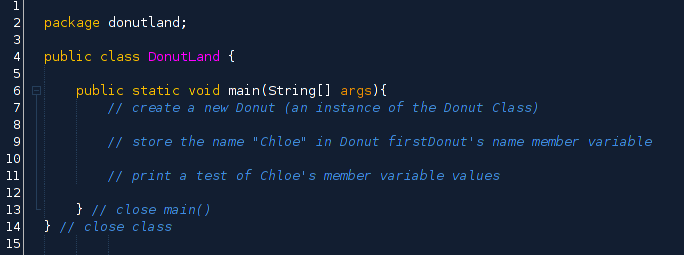
This DonutLand class has a main() method in which we'll create Donut objects and simulate their being eaten.
Step 4: Creating (instantiating) a Donut from our Donut blueprint in DonutLand
We can now actually model the creation of a Donut object in DonutLand. Let's look at the physical model of our first Donut (whom we'll name Chloe) and then we'll code it up in Java.
Figure 3: First Donut object created in DonutLand
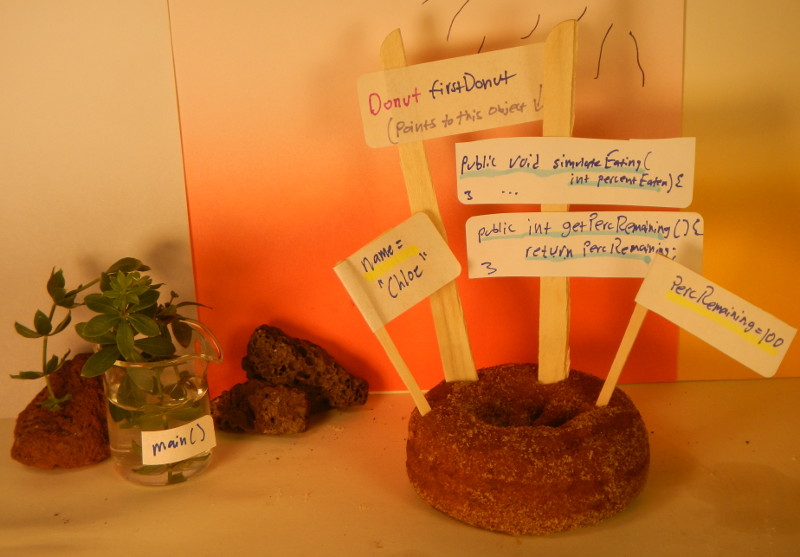
We have insstantiated (made a new) Donut object and we have stored a pointer (or a reference) to this donut in the variable firstDonut
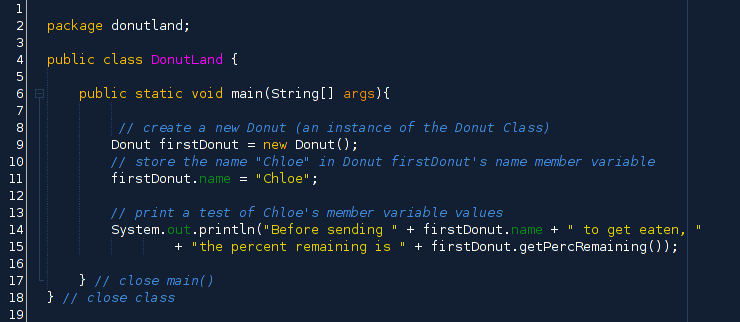
Inside the main() method, we are now ready to actually create the object using the new keyword and the name of the "blueprint class" which, in our case, is Donut.
Figure: The main() method inside DonutLand is where we create the first instance of our Donut object.
We have instantiated (made a new) Donut object and we have stored a pointer (or a reference) to this donut in the variable firstDonut
The all-important Pointer Variables
Let's look again at the most important line in our main() method we just wrote--the line where we create a new Donut object:

In this line, we make our Donut which we will name Chloe, with the new keyword. This tells the Java Virtual Machine to use the Donut class blueprint to create an instance of that class and store it in memory.
Three important events occur on this line:
- We create a Donut object with the new keywork.
- We create a pointer varible of type Donut called firstDonut.
- We store the reference to our new Donut in our new varaible
Line 11: We then use firstDonut to access the Donut object we just made in memory. We use the dot (.) access operator to access the name member variable that all Donut objects have. We assign that variable on our new Donut object a value of "Chloe."
Lines 14-15: Finally, now that we have a new Donut object, we can not only set but also get and print out information about that object by accessing it using firstDonut.
The two classes: Donut and DonutLand work together to create a full application. We can see that we use the dot (.) operator to access the member variables and methods on our Donut objects. We can then treat those methods and member variables like any other variables: we can change their value, print it out, etc.
Figure: Donut and DonutLand side by side in NetbBeans
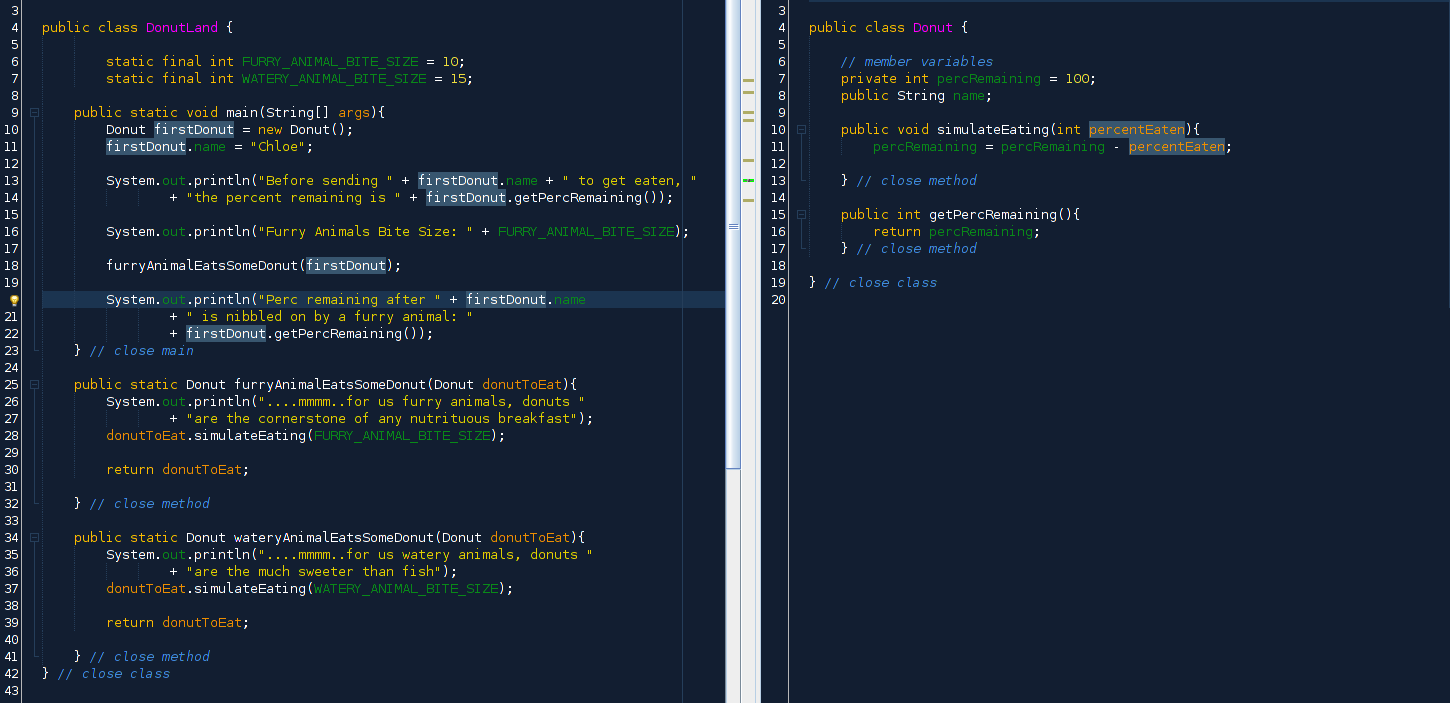
We are accessing the member variables on Donut inside our DonutLand class. This is easy to do because they are in the same package, donutland.
Showing evidence of our Object creation
When we compile and run this code, we generate output to the console. Below is both the call to println() and the text in the output console that this creates. Carefully study how the println() code created the output that it did, since this is all new stuff!


More on Pointer Variables
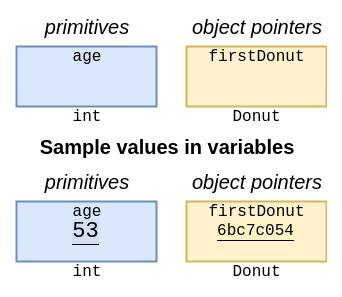
We can think of the pointer variable in similar terms as our more familiar primitive types like int and double. This diagram below shows our Donut pointer variable next to the more familiar variable diagram. The difference between them is that the int stores an actual value, whereas firstDonut stores the memory address of a Donut object.
Figure: Pointer variables compared to primitive type variables
A reference variable stores the location of an Object in memory. It's like an address book entry with a name, and we can use that address to access the member variables and methods on the object the variable points to.
We need to create a variable (not an Object) just like we make ints and Strings. The new part of this process when we create objects is that the type we declare that variable to be is no longer a primitive like int or double. Instead, the type of this variable is actually Donut.
In other words, when we create a Class, we also create a variable type. In this case, the new type is Donut. This variable called firstDonut can only store references to Donut objects--just like int type variables can only store integers.
When we create a Donut object, we need to have a pointer variable firstDonut to store the address of the actual object in Memory. The process of accessing objects through their pointers is like snail mail: We cannot send any mail to a house if we don't store its address somewhere, like in a page of an address book, which we can use to look up the house, street, and ZIP to send the letter.
We can represent this pointer / object relationship in a white board diagram:
Figure: Object/pointer relationship in Java
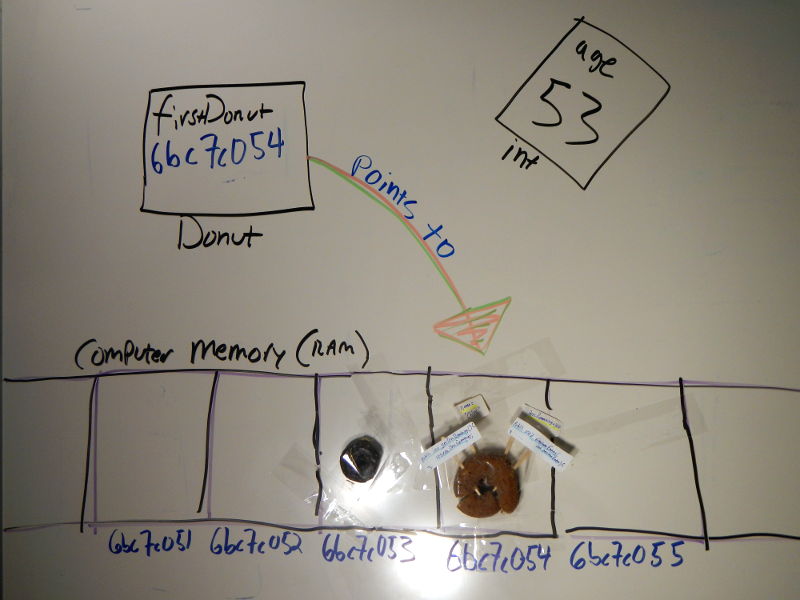
A reference variable stores the location of an Object in memory. It's like an address book entry with a name, and we can use that address to access the member variables and methods on the object the variable points to. firstDonut points to Chloe who is stored in the memory compartment with an address of 66c7c054. Many other objects, including other instances of our Donut object, are stored in other locations in memory, each with a unique addres.
motorcycle
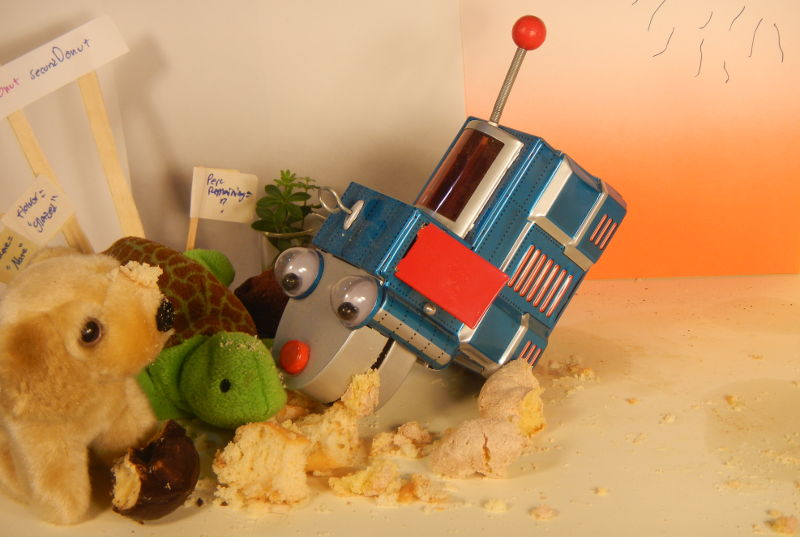
Exercise 3: Creating a RoboDog class
Build a similarly structured application as our DonutLand program but this time we'll create RoboDogs instead of Donuts. A good second step exercise for those not familiar with Object creation and manipulation.
Figure: Stuffed Dogs Meet RoboDog
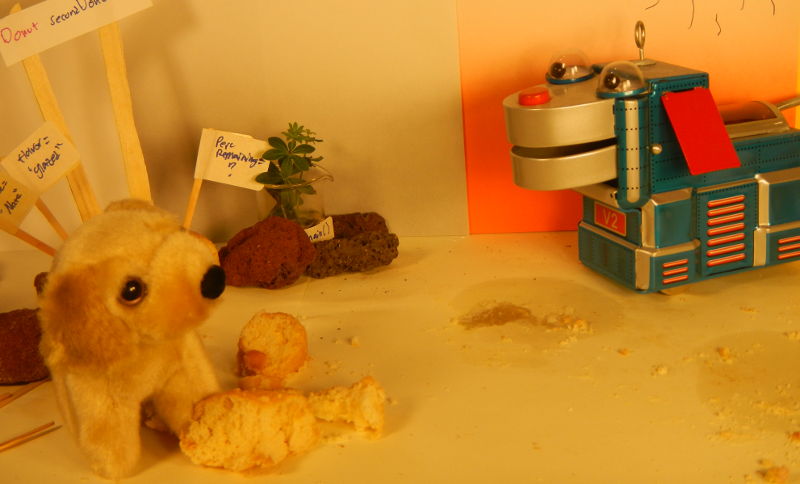
This exercise guides the building of a Robodog class in DonutLand to practice the object creation and instantiation process.
Start be creating a new project called "dogland" and a package inside that project called dogland. Inside this package, create a class RoboDog and a class called DogLand.
Step 1: Create Object Blueprint

Use the following class diagram to create your RoboDog blueprint class.
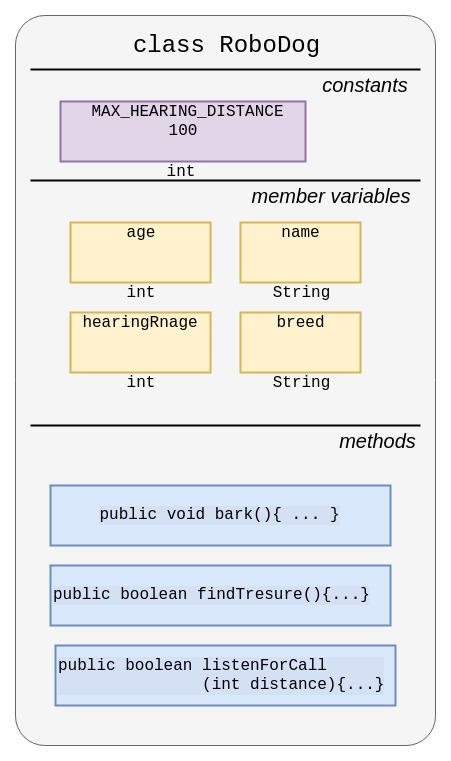
Step 2: Write method guts in blueprint

Each of the three methods in the RoboDog class now need to actually do something. The way that the methods work is mostly up to you. Check the method comments above each method declaration in the provided Object key accessible in the previous step. Don't peak at the key images unless you've asked a neighbor for help!
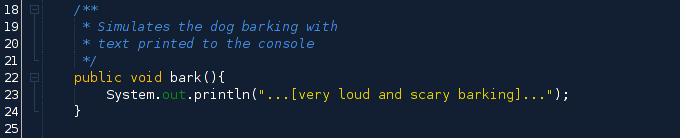
Program bark()
In this simple method, just make a call to println() that simulates a barking sound.
Program findTreasure()
Use a random number generator like java.util.Random to create a random number in some range you want. Then check that random number against whatever value you want to decide if the dog found a treasure. If the dog is a good treasure hunter, then more often than not, the dog should succeed. Return true if the dog succeeds in finding the treasure.
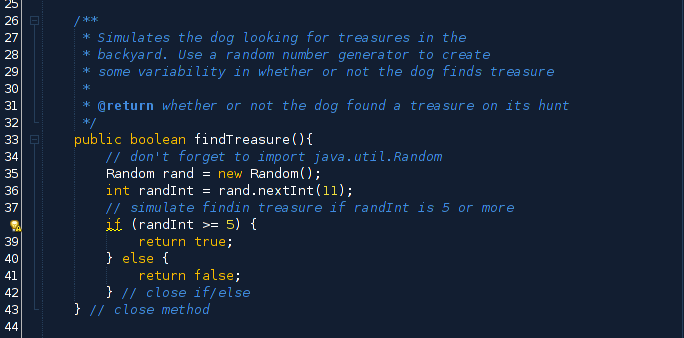
Program listenForCall()
You'll want to use an if() controlled block to check if the incoming call's distance is within the maximum hearing distance. We want to return true if the dog can hear the call
Step 3: Create an "application" class

Our job is now to create our second class called DogLand that has a main() method and methods that when given a dog, call certain methods on those objects to simulate behavior.
For now all we need is a class called DogLand and the main() method.
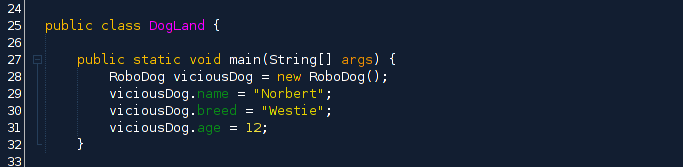
Step 4: Instantiate (construct) our object!

Now that we have a second class with a main() method, we can go ahead and actually create some RoboDogs!
Let's create a new RoboDog() and store it in a pointer variable called viciousDog. Once you have that object, set its properties: name, breed, and age using the access or dot (.) operator. Call this first dog "Norbert", his breed is "Westie" and his age is 12.
Create a second RoboDog, this time with a name, breed, and age of your choosing. Store a reference to this second RoboDog in a variable called customDog. Use the sample code provided above to model this.
Step 5: Test and tinker with methods and members

We now have two RoboDog objects which we can call methods on to test how the creatures behave. Follow these steps:
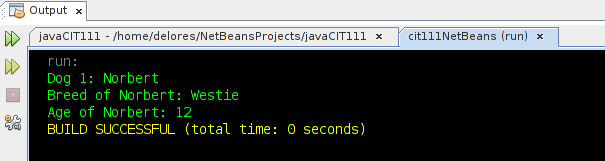
- Using calls to println(), display all the basic data about each of your two dogs to the console. The output for the first dog will look something like this:
- Call bark() on both dogs. The results should be printed to the console by the dog itself.
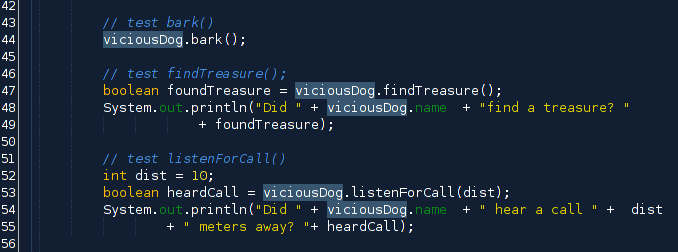
- Call findTreasure() on both dogs and display the results.
- Call listenForCall(int distance) on both dogs and write code that displays a value that makes sense to the user. Remember, you'll get a boolean of either true or false. when you call this method. Create two vars of the return types of these methods.
A sample of the output desired in this testing process is as follows, for one dog only. Your code will display this for two dogs:
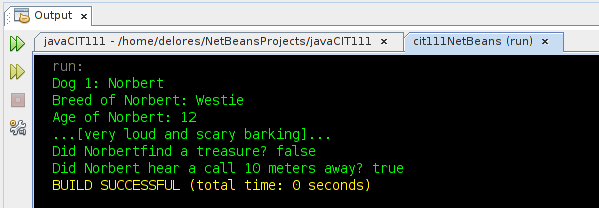
You can check your work against sample code for calling the core methods for one dog only:
Explore Further 1: Robots like to eatDonuts() too!
Java's power lies in the way we can combine objects to model and accomplish meaningful computer tasks. We can practice this by introducing a food source into Dogland and we just happen to have Donut lying around just for this purpose. Walk through these guiding steps:
- Copy the Donut class from donutland package into our dogland package. You'll do this in the project explorer pane on the left side of the screen. You DO want a "Refactor Copy" which means NetBeans will change the package names to reflect the copy's new location in a different package.
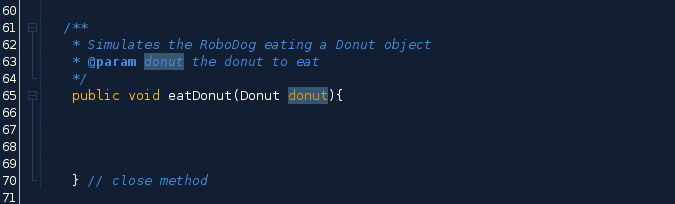
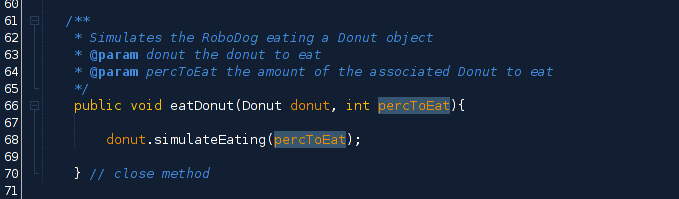
- All other classes in our package can now create and work with Donuts. Let's adjust create a method on RoboDog called eatDonut which simulates the creature eating a Donut. Try writing the method signature yourself, before peeking. Diagram it out! The input must be...a Donut. The return type should be void.
- Write the guts of eatDonut which calls the simulateEating() on each Donut that is passed into this method. Remember, the method itself is responsible for calling the simulateEating even though we could "just call" the simulateEating method directly from main().
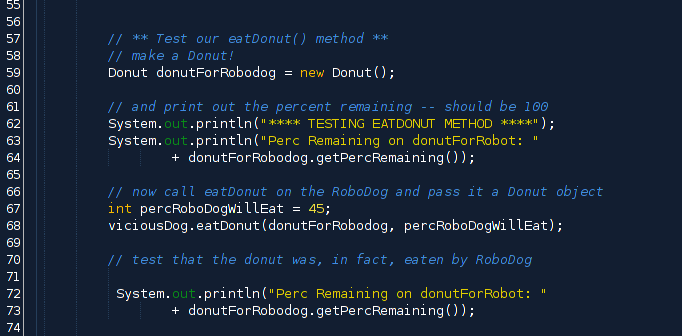
Note that when we call simulateEating on any Donut we must pass in a percent to eat. We'll need to pass in this value to eatDonut as well, which we'll turn around and use in our call to simulateEating. This is a somewhat complicated chain of method calls, so take time to envision the way this method will work before you peek! - With a working call to eatDonut in our RoboDog class, we can return to our "application" class DogLand and test our new method. You'll need to make a new Donut which we can pass to our instantiated RoboDogs. Once you have a Donut, we can demonstrate our new method eatDonut by passing the Donut into eatDonut.
Remember to print its percent remaining to be eaten before and after this call to eatDonut so we can prove that our method is behaving properly. You should add a call to println() INSIDE eatDonut so that we can see how the call
Our output can look something like this: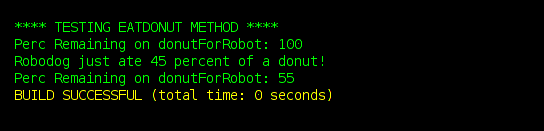
- Keep tinkering! Now that you are more familiar with the pattern of creating objects and passing them to other objects, cook up some other interesting interaction between the RoboDog and Donuts. Be sure to demonstrate your new code with prints to the console.
One silly idea might be to build a function where a RoboDog can sneeze on a donut, which toggles a boolean variable on that Donut. Then the RoboDogs start checking each donut to make sure it has not been sneezed on before eating it. If the Donut has snot all over it, a message is printed to the console and the requested bite of the Donut is not completed.
Explore Further 2: Refactor DogLand to work through methods -- not main()!
- Create a public and static method called makeDogBark that takes in a RoboDog as a parameter and returns nothing.
- Inside that method, call the RoboDog's bark() method.
- Now create another public static method called sendDogToFindTreasure(RoboDog dog) that calls the appropriate method on each RobodDog that is passed into the method
- Finally, create a method called callDog(int callDist, RoboDog dog) that takes in a distance in meters and a RoboDog to call. Notice that we're going to use the callDist value that is passed into the method when we call the appropriate method on our RoboDog. This is a little tricky--think through it. The method on RoboDog will return true or false, which we want to capture and print out to the console.
- Expand on the previous step by building in user input to our DogLand class such that when the callDog() method is called, the user is prompted for a distance from which to call the RoboDog and you could even ask for a String phrase that the person might yell to the dog. After the user enters this information, then make the call to the RoboDog's listenForCall() method and display results to the console.
motorcycle
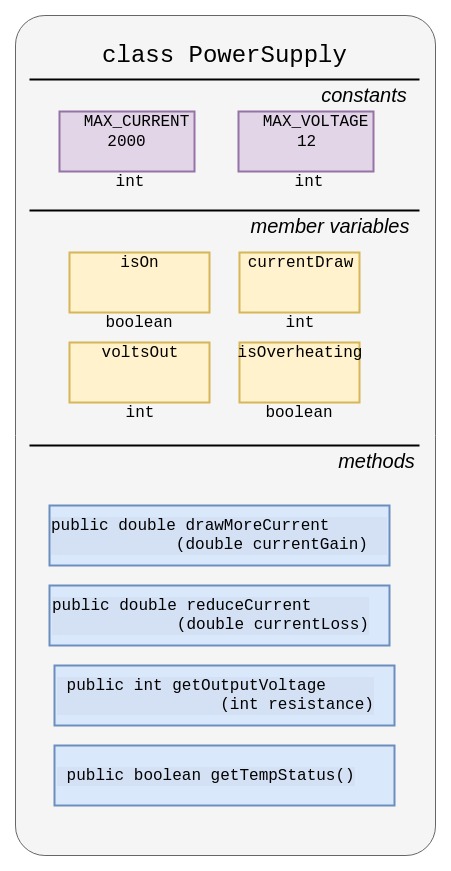
Exercise 4: Creating a model of a variable DC power supply
Model a power supply with an application structure similar to our DonutLand application. Requires more conceptual knowledge of power supply behavior--but on a very basic level (i.e. too much current draw overheats the unit).
Step 1: Create Object Blueprint
Here is a sample class diagram that you can model in code. Feel free to tinker with this design to make it more or less interesting as you'd like.
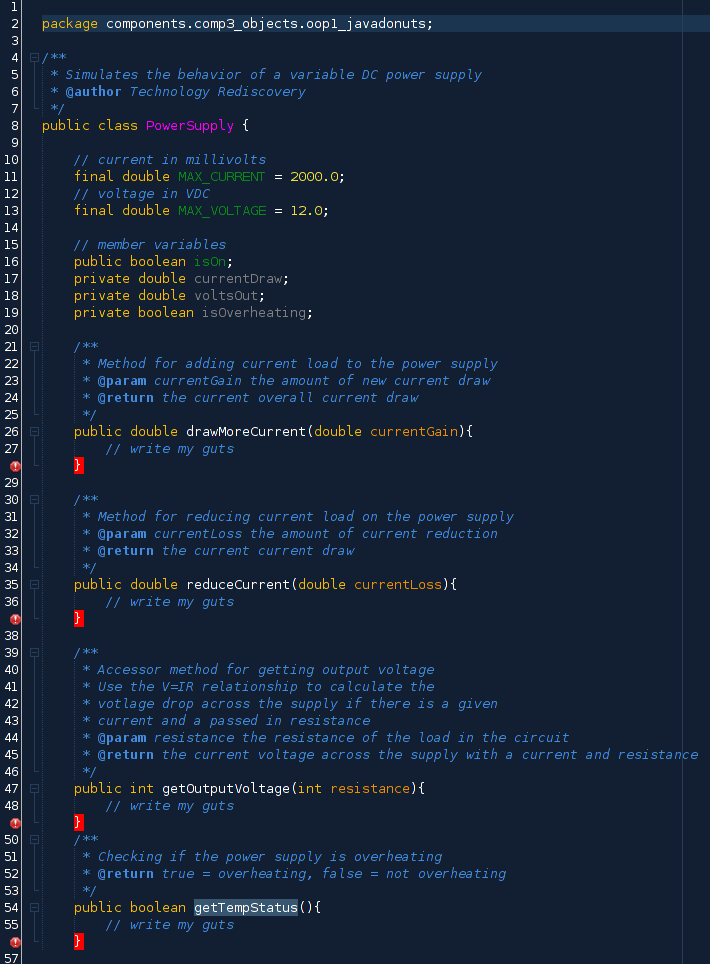
Step 2: Write method guts in blueprint
You'll need to do some careful thinking on the getOutputVoltage method. Otherwise, the other ones are simple manipulations on the member variables
Step 3: Create an "application" class
You can call this class whatever you want. It will have the main() method.
Step 4: Instantiate (construct) our object!
Use the new keyword to make a PowerSupply. Try making a few and seeing if they can be customized in any way. Perhaps add some special functions that the supply can do that aren't listed in this activity.
Step 5: Test and tinker with methods and members
Test all functions, and use the console to prove that your methods work as expected.