The Object project
Creating a Java version of a material object--and share it!
Put your skills to good use by choosing an object that has some interesting behavior that you'd like to model (guitars, calculators, etc.), plan out your object, and then transform that plan into Java code!
Jump to a section
check_boxCore Project Tasks
extensionConceptual Core: Object Modeling in Java
bookResources and reference documents
Project Phase Guides
 looks_onePhase 1: Choose an interesting, highly "modelable" object
looks_twoPhase 2: Create a written object plan
looks_3Phase 3: Translate object plan into Java code
looks_4Phase 4: Write a "testing class" with a main() method
looks_5Phase 5: Document & share your work
Core Project Tasks
| check_box | Create a class diagram that represents the state (member variables) and functionality (methods) of a single physical object |
|---|---|
| check_box | Translate a class diagram into a Java class (or set of classes) that models the behavior of the planned object through command-line interaction and contains no main() method |
| check_box | Create a class with a main() method which creates an instance of the modeled object and demonstrates all of its functionality.fixed |
book
Module Learning Resources
Amazing gallery of past student object projects with building guides, code samples, screen shots, and commentary on class structure.
Class structure learning module: Reviews basic structure of any class in Java.
extension
Conceptual Core: Object Modeling in Java
The object project is about designing two classes that work together:
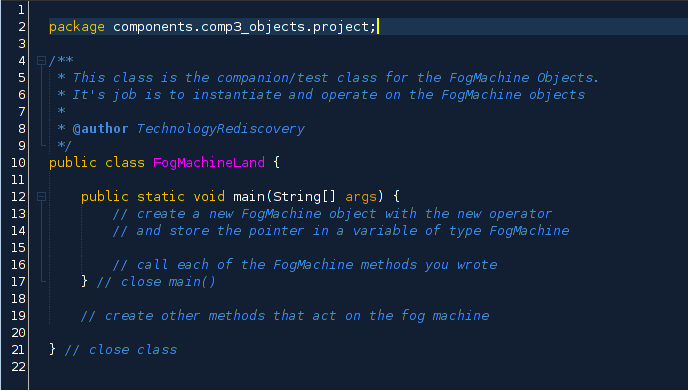
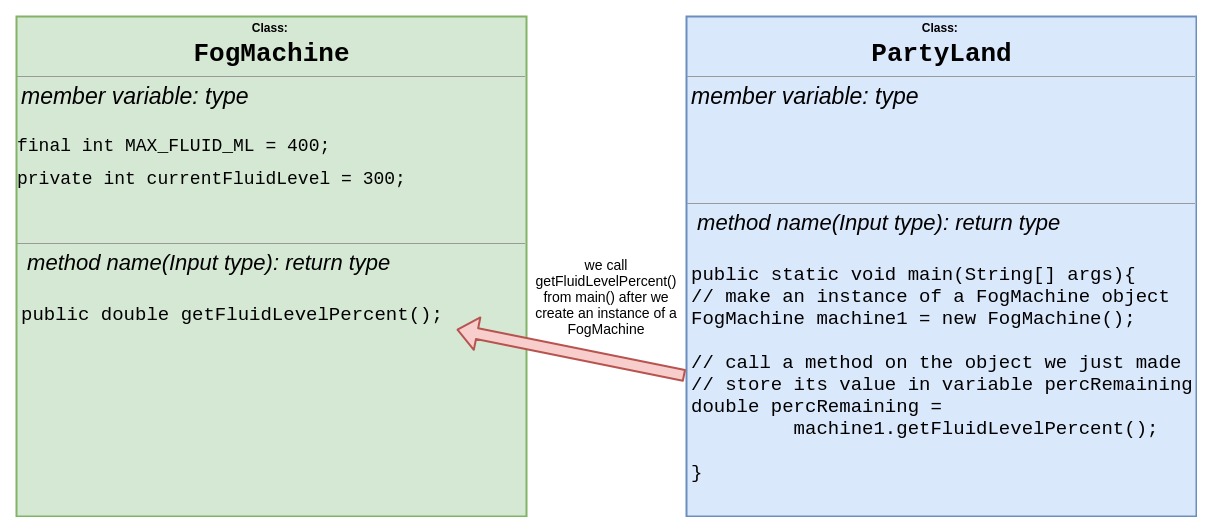
- A blueprint for creating instances of that class as a Java Object. We don't use static in our blueprints, because static means "not used when we create this class as an object".
Also, we don't need a main() method in a blueprint class since it will be used to create an object, not as a stand-alone program. In this example of modeling a fog machine in the class called FogMachine, our blueprint class is this one: FogMachine - A client class that creates an instance of our blueprint object using the new keyword. This can happen in any method we'd like, but for this project, we'll make an instance of our blueprint class as a Java object in main(). Once we have this object, we'll call its methods and actually use it to do something interesting, like simulate a fog machine's actions to create a party!
In our example, the client class is called PartyLand and it contains a main() method that directs the whole show.
looks_one
Phase 1: Choose an interesting object

Brainstorm and choose to model an object that lends itself to being modeled in Java. As we know, Java classes are blueprints for objects, and those classes hold member variables and methods related to that object.
No good ideas yet? Explore the object project starter page for code and more discussion about object modeling.
Examples of solid object model ideas (click links to jump into the project seed page)
- Fog machine
- Fish tank
- A fish in that tank, or other animals
- A character in a game or story with special powers
- A bank or bank account
- A word game (hang man, test for reversibility, etc.)
- Electric guitar
- An Automated Teller Machine (ATM)
- Scoreboard or sports statistic generator
- A player of a particular sport
Examples of weaker object model ideas
- An entire video game
- A computer or computer-like device (mobile phones, game machines
- A computer screen
- An entire sport
- A rock, or any other mostly inert object that just sits there
looks_two
Phase 2: Create a written object plan

Create a class diagram as we've done for weeks now that includes:
- The class name
- Member Variables and their types
- Carefully designed method calls with input parameters and return types
We have seen many such models in the course so far. Your class diagram should have these components, arranged in this order. You can be creative as long as it has the essential structure:
looks_3
Phase 3: Translate object plan into Java code

With a class diagram and some solid thought on your Object design, you're ready to code. Follow these guidelines as you do so:
- Create a package with an appropriate name. Inside that package, create two classes: one with your Object's name, such as Calculator. Create another class that will test that blueprint-like-class class by creating an instance of that object with the 'new' keyword. You can name this class something like CalculatorLand if your object is a Calculator.
- If you use code from any source other than your brain, please note those sources in your code as you go--Don't wait until the end of your project to try and add the citations later. Do it when you use it.
- Code your desired object in your class named that object (i.e. MissionControl). Create your member variables with appropriate types.
- Write the method declarations for each of your Object's methods. This means writing the method name, its access modifier, return types, and input parameters.
- Start coding the methods themselves after the structure looks good. Process the input parameter as needed, adjust member variables, and return the agreed value
- Add comments above every method and class describing what the method does or what the class represents
- Since your Object class is supposed to model an existing object, its variables and methods should NOT be declared static. We're making a new instance of your object, in which case the members and methods would no longer be considered static.
looks_4
Phase 4: Write a "client class" with a main() method

Write a "client" class that makes and uses our object
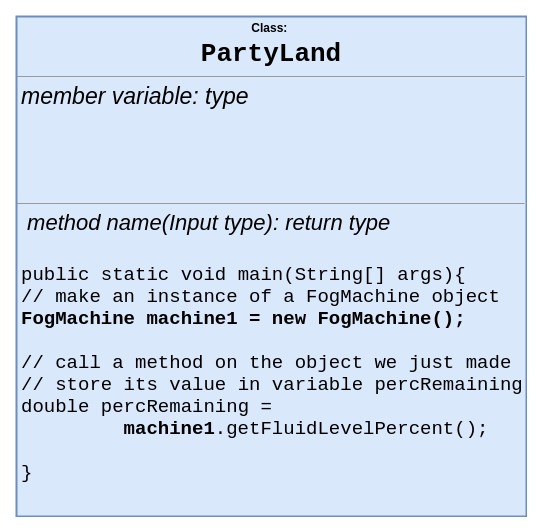
Our client class, in this example the PartyLand class represents the larger application that uses our object. When we create an instance of a FogMachine with new and then use a FogMachine object by calling one of its methods, such as generateFog(), we are acting as the client of that object, This is represented in the analogy of a steel supply business which provides big, heavy stuff to its clients. Our object that we're modeling provides information to the class that calls its methods.
We can zoom into our PartyLand class and see how this is done.
Phase Steps
- Create your client class with an appropriate name
- Compose a main() method in this class. In main, use the new keyword to create an instance of your modeled object. Store the reference that you receive from the object creation process (right side of the =) in an appropriately named variable.
- Using the dot (.) operator on your pointer variable to access the methods you wrote on your modeled object. Show the user what your object can do!
looks_5
Phase 5: Comment, Package, and share

Wrap up and share your work by following these steps precisely!
check_circleStep 1: Check and Comment
Check over your code and make sure you have commented each method by describing what that method does. Make a note of where you create an instance of your modeled object
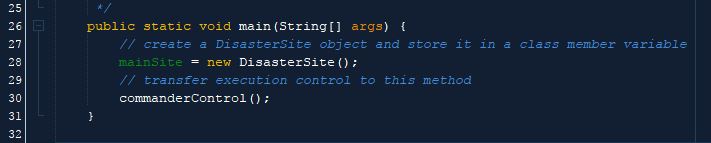
Here is an example of creating a DisasterSite object in MissionControl class.
 check_circle
Step 2: Locate your package's source code directory
We are going to package up the following three items in a single directory, and then compress that entire directory for posting to the shared drive.
- Your package and source code (*.java files)
- A digital version of your class diagrams (for your blueprint object and the client class
- A screen shot of your program's output and user interaction
Open the Windows file explorer program
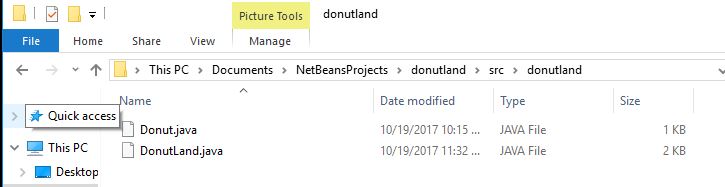
To find the source director for your PACKAGE you need to first find the directory for your entire PROJECT. This is inside the "NetBeans Projects" directory, which is stored in the Documents directory for your Windows user. Navigate to the following location:
Netbeans Projects / [your project name] / src / [your package name]
You should see at least two .java files in this directory. You'll save the screen shot and class diagram in here, with the .java files.
Leave this directory open in Windows Explorer so you can prepare your package for uploading in two steps.
Note this example of finding the .java files for DonutLand
 check_circle
Step 3: Capture and properly save a screen shot of your program's output
Run your program with various user inputs to show your Object working.
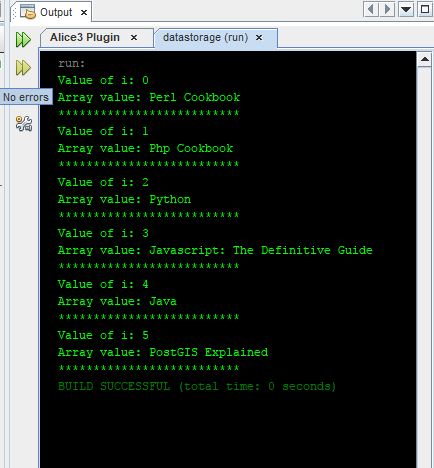
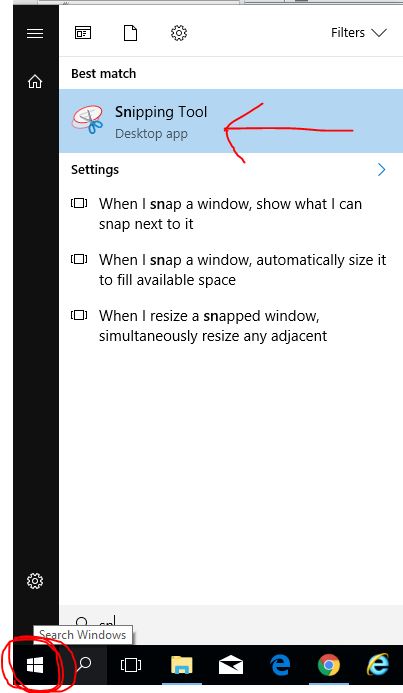
Use the Snipping tool built into Microsoft Corporation's Windows 10 operating system (click the "start" button and search for "snipping"). Your snipping should look something like this (with different colors):
Once you are happy with your clipping, save the image into the directory with your .java files!
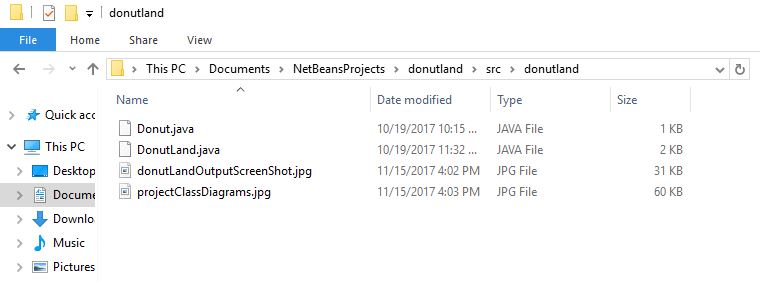
check_circleStep 3: Create and/or just save a digital version of your class diagrams into the same directory as your screen shot and java files
Use any program you'd like: MS Word, draw.io google doc extension--anything--to create an accurate and pretty class diagram of both of your classes: The modeled object and the client class
Save this file into the same directory as your .java files and screen shot
At this point, you should have your package directory looking like this: with .java files, a screen capture of your output, and a file or two of your class diagrams.
 check_circle
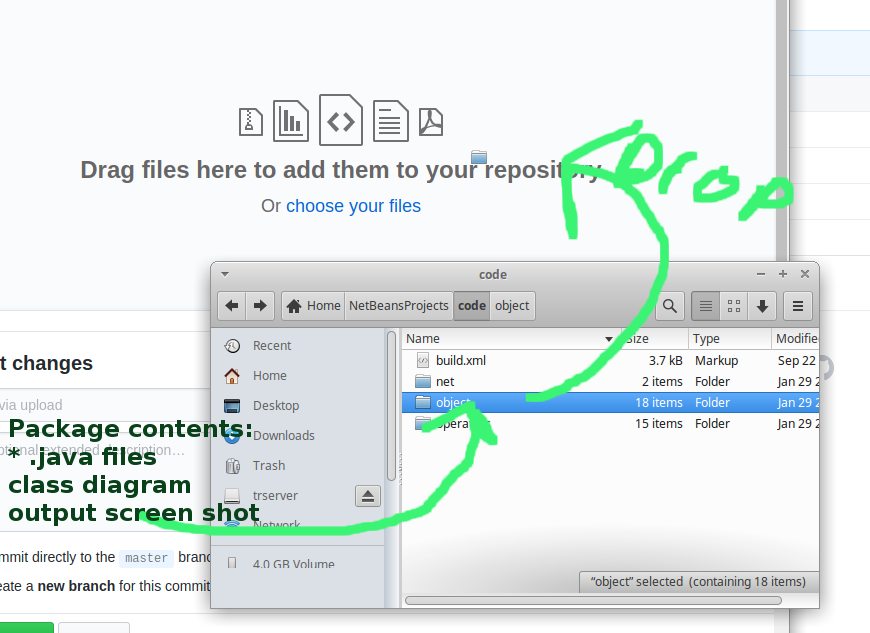
Step 4: "Click and Drag" your package directory into your GitHub account
- Check to make sure you have a package directory that contains your .java files, your screen shot, and your class diagrams.
- Log into your GitHub account. When viewing your repository home, position a windows explorer / file explorer window next to your window with GitHub.
- Click "upload files" in one of GitHub's menu bars. This should bring up a screen that receives uploaded or "dragged" files and directories. Now drag your entire package directory from your local drive to your GitHub repository.
- Once the upload is complete, be thorough and check to make sure the uploads worked for each file. Remember, you can upload images and all sorts of files to GitHub. But only source code files and images will be displayed correctly when you click on them in your repo.
 check_circle
Step 5: Make a lovely entry in our submission index
Because you have uploaded an entire directory to GitHub, the link you'll post in the tracking spreadsheet should be to the entire directory, not to any one individual .java file as you are used to from past projects.
HURRAH! You're done!
Extension Question:
For those of you who like object design discussions, respond to this prompt on a separate paper and include it in your Object Project hamburger
You are pitching your object model to a group of developers who have volunteered to help you continue building your object into a full-fledged application. Respond to their question: “How is using Java’s object model an appropriate choice for for representing the material object you chose?” (Hand-write answer on paper and include in hamburger, or feel free to type, of course.)