
Looping with while()
wb_incandescentWhile() Loops in Brief (3-5 mins)
Companion video tutorial
In Module 4 we explored how the if() structure in Java can control the execution of blocks of code { .. } by evaluating a true/false test that uses a comparison operator of some kind such as < or > or ==. This module introduces a cousin of the if() block called while() which allows for repeated evaluation of a true/false test. As long as the value of the test expression is true, the while's block { .. } is executed over and over again.
Try coding up this nifty 'lil program that prints a single phrase 10 times with the help of a while()-controlled block. Then build your tinker muscles by printing your own phrase 10 times, then 1000 times--perhaps even 100,000 times!
bookExternal Resources
- Oracle's on-line tutorial: Control structures

- TutorialsPoint has a nice write-up on if() statements
 and includes flow diagrams like the ones we work on in class as well.
restaurantModule Hamburger Guide
Optional and intended for in-person sections
Print off the hamburger guide for this module, review it carefully, and complete its sections as a culminating activity for this module.
When your module is in ship-shape, fold the module page hamburger style and slide all of your module documents inside the fold. Place the whole hamburger into the right pocket of your folder for review.
Learning Core 3 (LC3) Hamburger (*.pdf)
Learning Core 3 (LC3) Hamburger (open document text *.odt for editing)
check_boxLearning Objectives
- Plan an application with if() and while()-controlled blocks using an accurate flow diagram of execution.
- Get exposed to for() loops that we'll cover in the second half of the course.
- Implement while()-controlled blocks to meet a program's specification, including the use of the break statement
- Use block nesting of if() and while() blocks to implement complex program logic.
webSet up your workspace
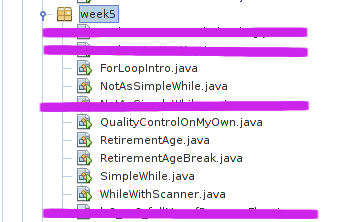
- Create a new package called week5 in the NetBeans project you're using to assemble your code for this course
- Create classes with the names shown in the photo below this list which you'll code up during this module
- Split your screen so you can work in NetBeans in one half and see this tutorial on the other half
extensionCore Concept: While() fundamentals
Companion video tutorial
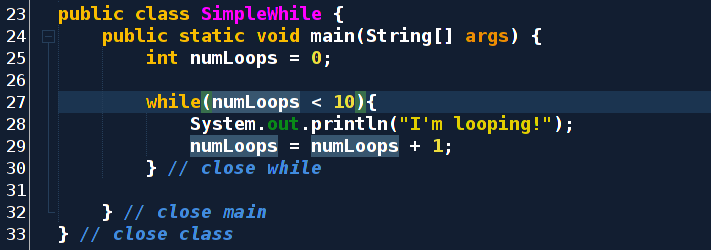
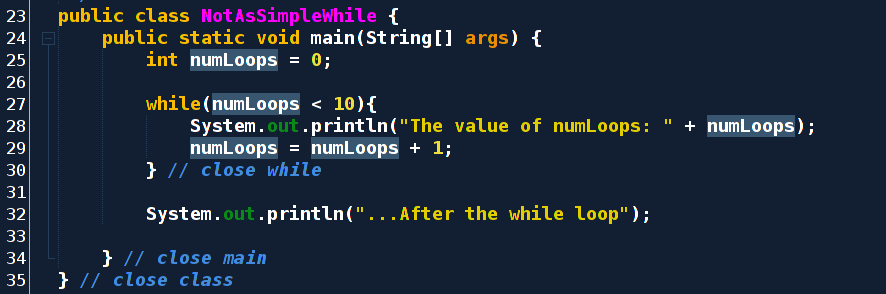
You should have programmed your first while() loop when you read the introduction to this module and saw how while()-controlled blocks work at their most basic level. Just in case, here's that program again:
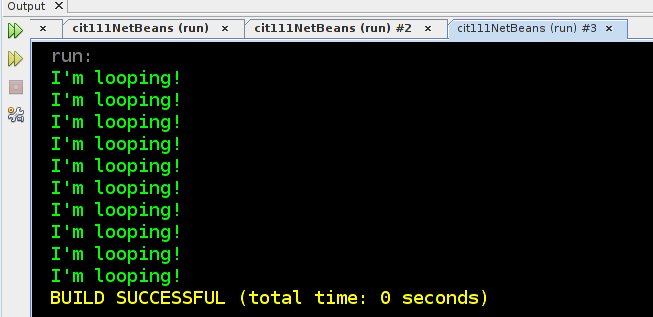
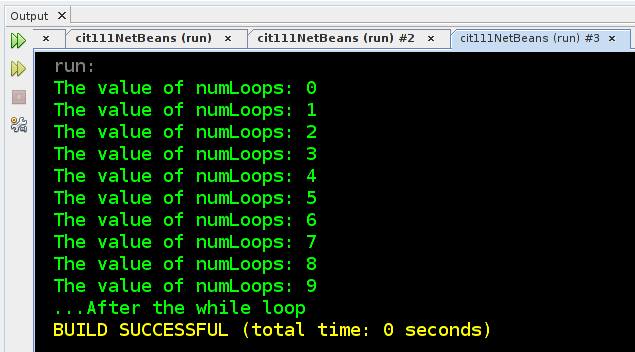
When we execute this program, we get a predicable output: 10 copies of the statement "I'm Looping!"
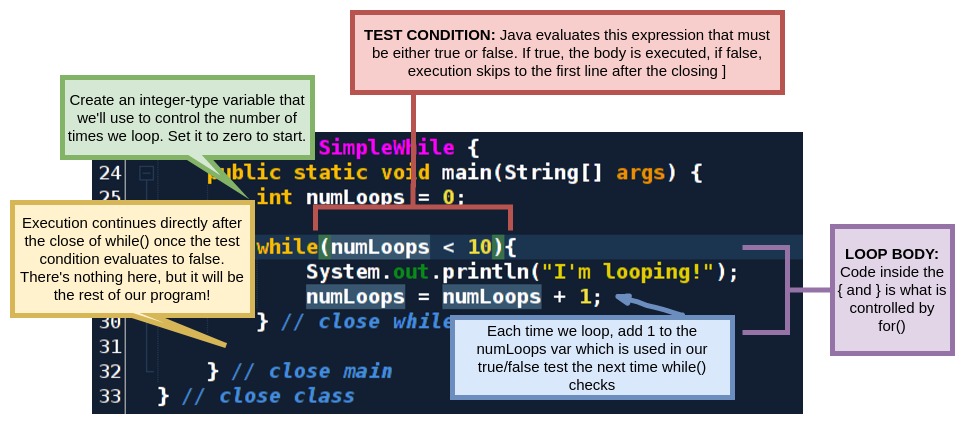
Dissecting the while structure
Study the following diagram along with the previous sample program to understand how the various parts of the code interact to create a looping mechanism:
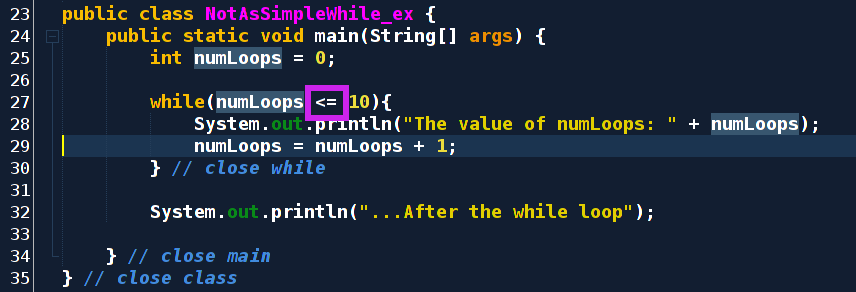
Let's edit this program to see the inner workings of the true/false test that the while() statement executes: numLoop < 10. Our while() statement compares the value of the int-type variable numLoops to the hard-coded int value of 10:
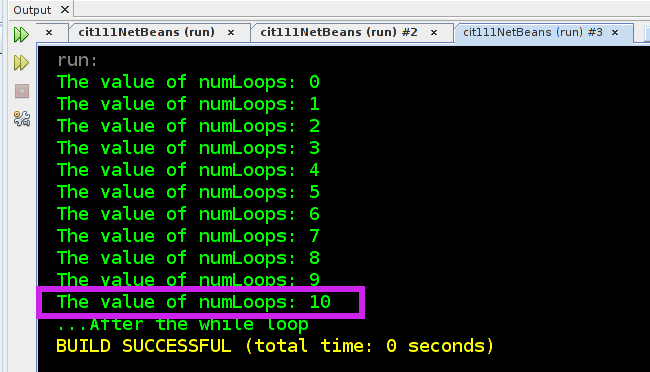
And the output of our new program:
Mini-Core Concepts Challenge!
After studying the above output carefully, you may wonder: Why did the value of numLoops that got displayed end at 9 instead of 10?
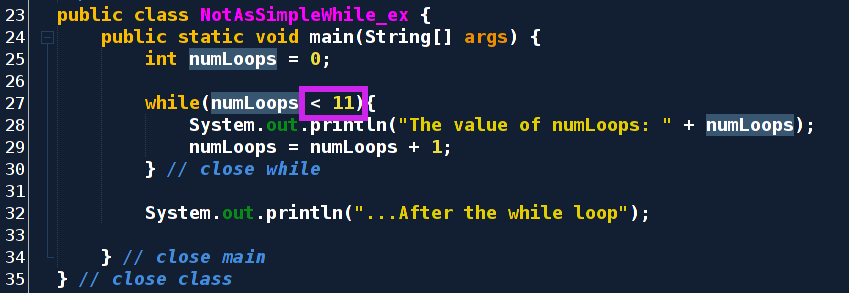
Experiment and find THREE different ways to refactor (programming speak for "edit" or "change" systematically) this simple program so that we can see numLoops reach 10 on the output. You'll probably think of one way quickly, the second way a little slower, and need to ponder for a minute to reach the third. Try not peeking at the solution until you've given it a good go.
Desired output:
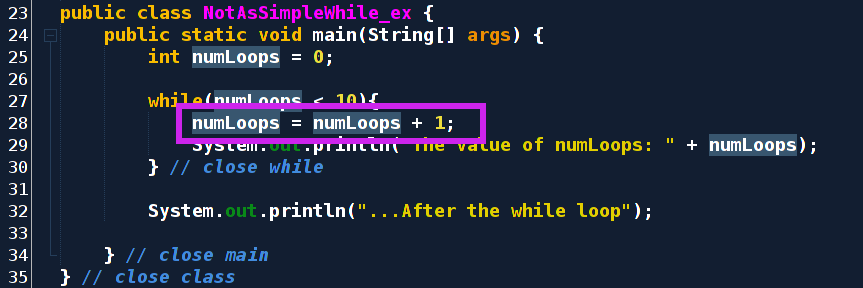
Three HINT phrases: 1. operators 2. instruction location 3. hard-coded values
extension Core Concept: User-Controlled loops --Scanner objects and while() looping
Companion video tutorial
This mechanism for controlling the execution of the while() block is not very flexible, since the integer 10 is "hard-coded" into the true/false test numLoops goes up by 1 with each loop. The program is looping, but in a static way.
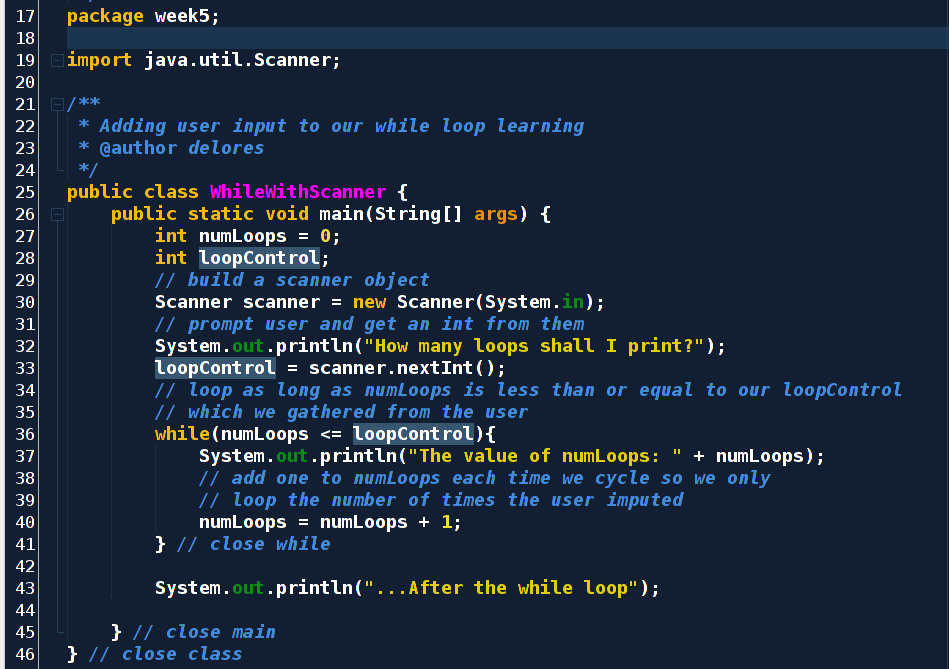
Let's refactor our basic while() so that the user sets the value of numLoops. Transfer this code into your own program in the SimpleWhile class. We'll use the Scanner object we learned about last module for this simple task. (note that the name of the class in this screen snip is different since each program change is a separate file in your course repository):
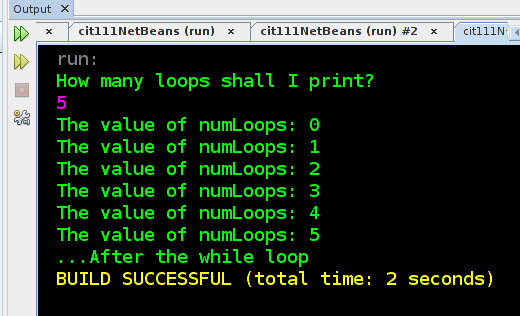
The output of our program shows that the value the user inputs is used to control the number of times the while()-controlled block is executed.
You should have this program running on your computer before continuing. Let's study the changes we made carefully:
- We kept the line numLoops = numLoops + 1 in the body of the while() block (i.e. everything that appears inside the { ... } after the while true/false test) since we want to adjust our loop tracker by 1 each time we cycle through the loop.
- In order to get user input, we use a Scanner object which is a class in the java standard library. To use this library code, we must import java.util.Scanner which we do with an import statement located after the package declaration and before we define our class.
- An int-type variable loopControl was added which is loaded up with the user's entered value.
- The test statement controlling the while was adjusted to be: numLoops <= loopControl. Since our numLoops was created and initialized to 0, the number of loops corresponds to the user's input (+1 since java's variables start at 0, not 1).
- A simple prompt to the user was added with a call to System.out.println()
Tinkering ideas:
- Adjust the number we initialize numLoops to at the start of the program. See how the output varies.
- Try moving the line loopControl = scanner.nextInt() inside the while() loop and see what happens. What did it do that? Read the error message carefully. Try giving loopControl an int value to start with.
- Add a second prompt to the user so that they can write the phrase that will be repeated. Remember, instead of calling the nextInt() method on your Scanner object, call nextLine() to get a string.
extensionCore Concept: Enter the for() loop (temporarily)
Companion video tutorial
Programs often do similar things to accomplish different problems. For example, we often want to control the number of times block of code executes using a variable like numLoops and loopControl. This becomes such a common pattern that a special relative of the while() loop exists in Java that allows us to initialize a counter-like variable and increment it each time the loop executes.
The for() loop allows us to do just this. Type this code into your ForLoopIntro class and verify that we can generate exactly the same output as the previous example using several fewer lines of code (and hence, more readable code):
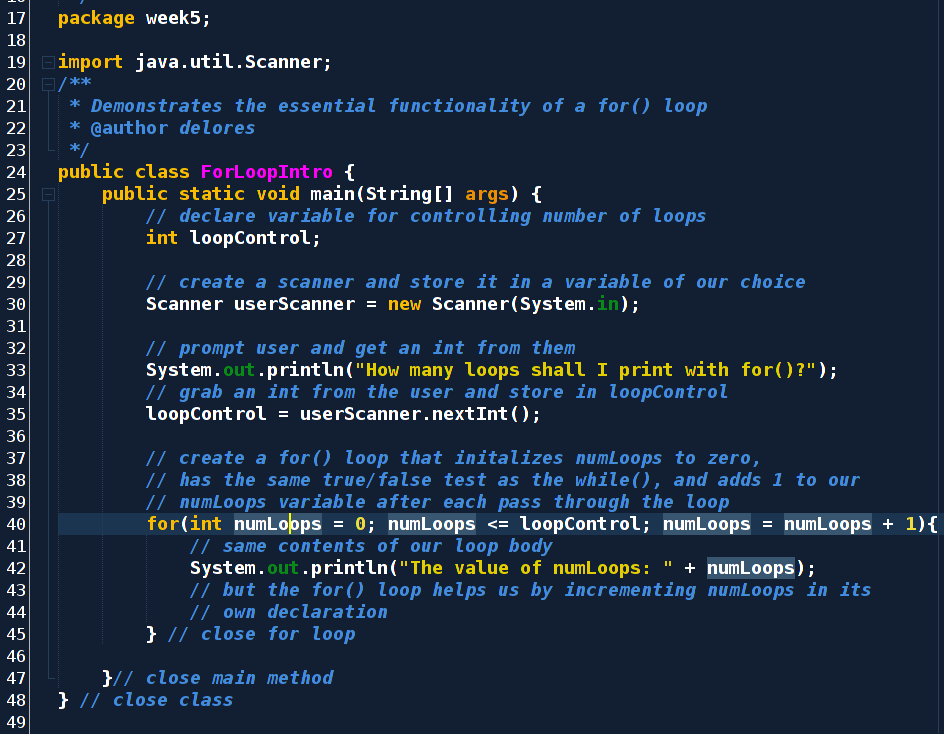
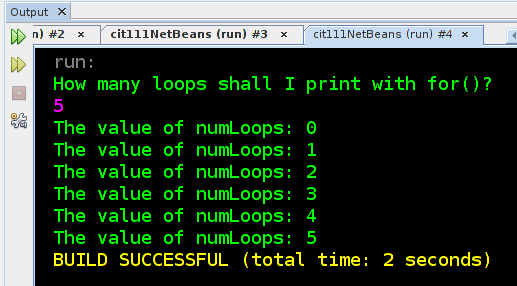
Note the output of this program is exactly the same as our while() loop version.
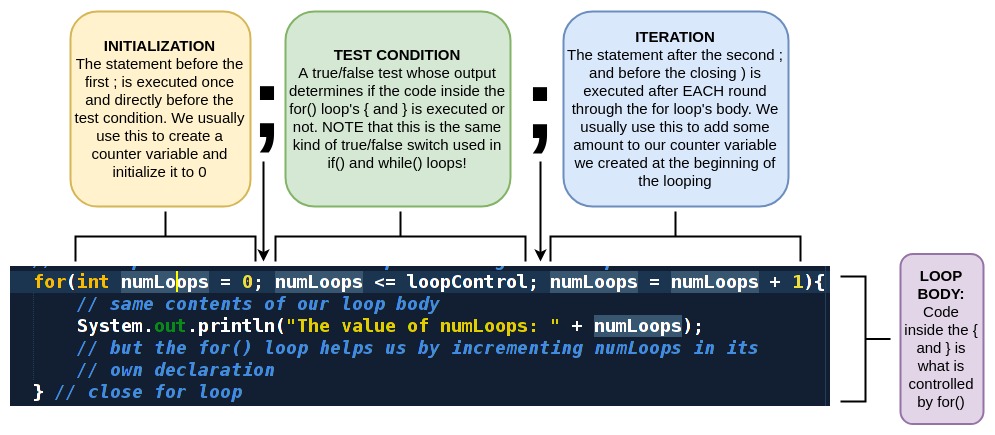
Dissecting the for() loop
There is a lot going on in the single line of code that declares the for() loop. It's complicated since it's doing everything we did with while() above in 3 separate lines in one. Study this diagram carefully to get a grasp of what is happening in the code:
But why is this a temporary introduction?
For() loops are most useful when we're working with data structures in Java called arrays and iterable objects. We'll get to these wonderful components of the language later in the course. You should be familiar with this structure since you'll often read code that uses for() loops and you should know that it is a variation on the while() statement and used for controlling a chunk of code based on a true/false test.
extensionCore Concept: Flow charting nested logic
Companion video tutorial
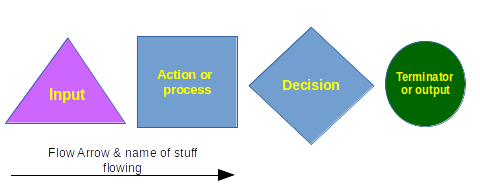
We worked with flow charts last module, and we will do so during pretty much every module in the future. Let's remember the essential elements of flow charts (events, decisions, flow):
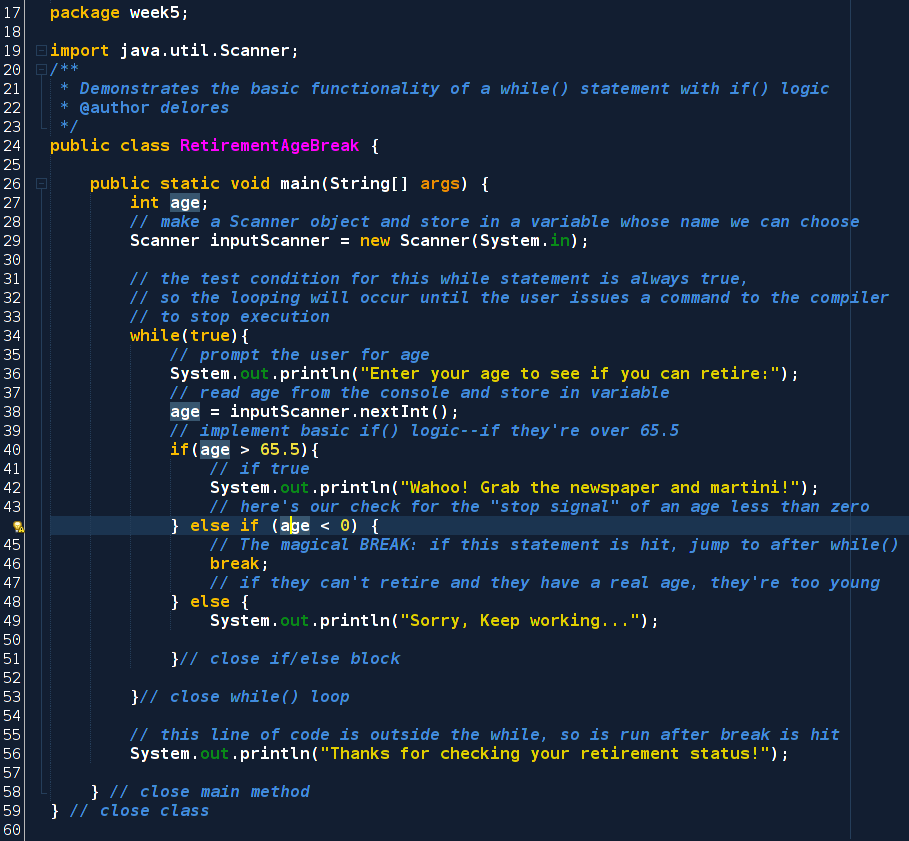
Now, imagine an old computer sitting in the lobby of the IRS retirement office that runs a simple program so folks can walk up to the computer, enter their age, and the program will tell them if they can grab their newspaper and martini or go back to work. We want this program to run forever--it just keeps asking the user for an age and giving a response. The while statement can be helpful here, even if it's not being used to its full potential. We can diagram the program we want like this:
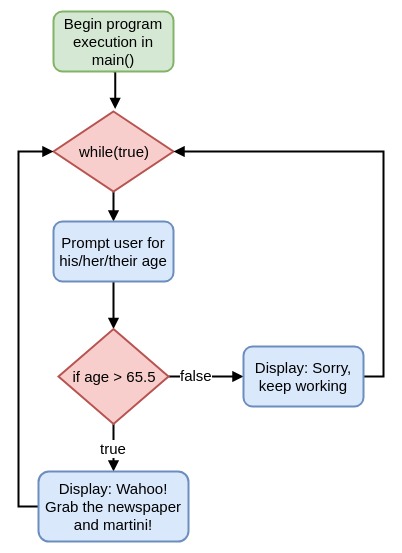
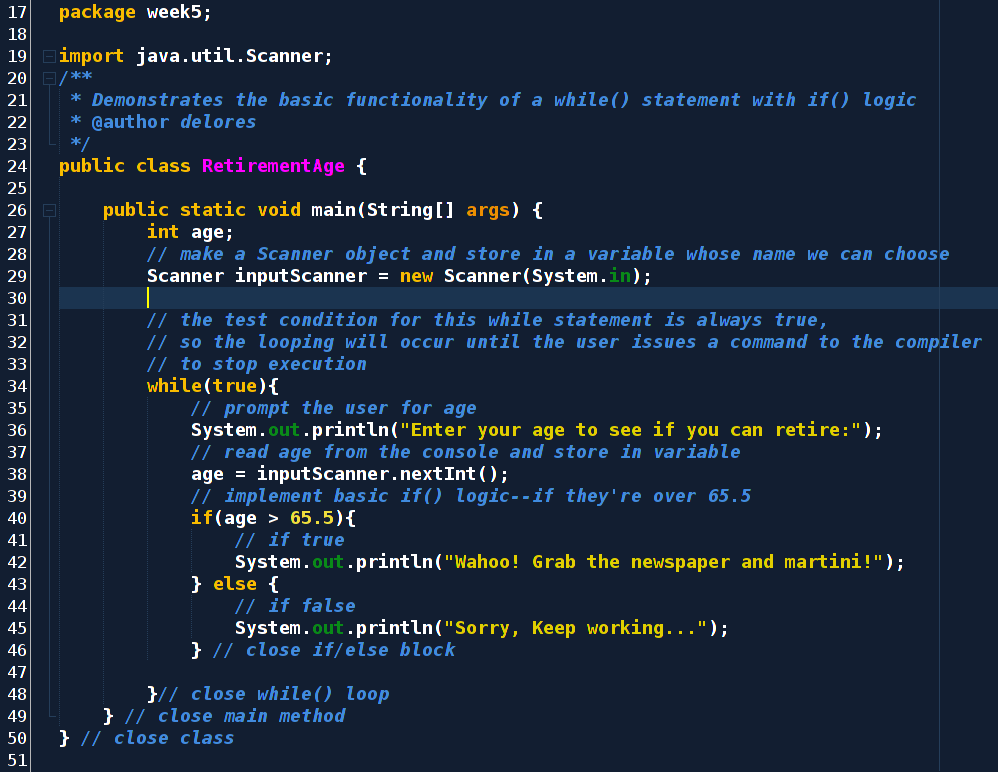
Now that we've got a solid plan down, we're ready to convert this flow chart into Java code. Please transfer this code into your class called RetirementAge and make sure the output works as expected by testing a few ages. .
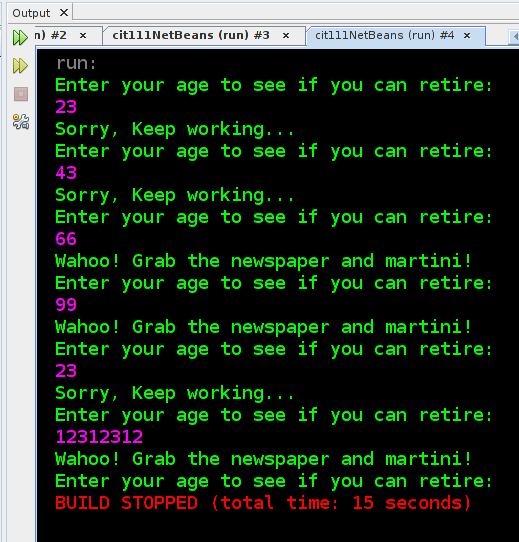
warningNOTE: This program is a "forever" loop since there's no way for the program to exit (i.e. execute all the lines of code in main() ). You'll need to use the little red stop icon in your output console to exit the program.
Program output with a variety of ages inputted to test the logic
Avoiding the endless loop with break
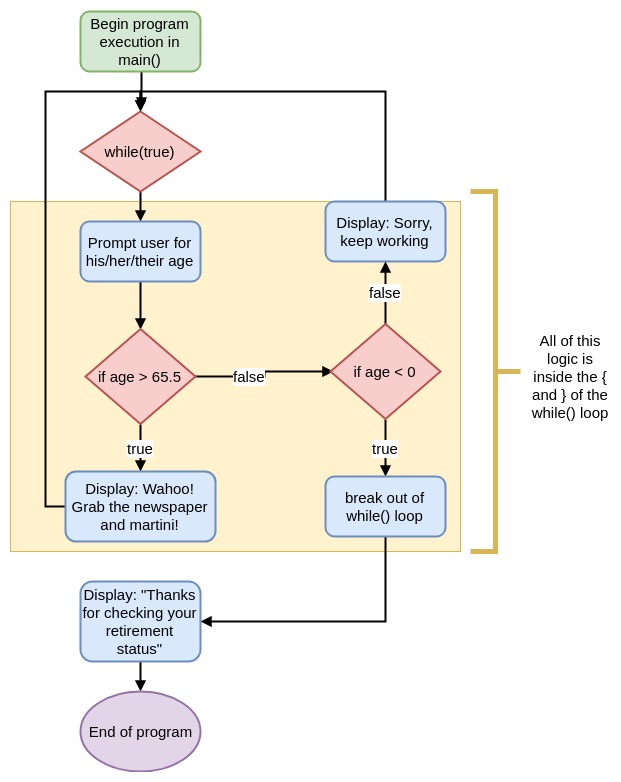
The above retirement age checker program illustrates that all sorts of complicated things can happen inside a while() loops controlled block { ... }! Using the constant of true in the control statement of the while() loop, however, should be accompanied by a way for the user to end the program. This is where Java's break comes on the scene. If the compiler encounters the keyboard break, execution jumps immediately directly outside the block of code it's in, and in our case that's the while() block.
Let's add some logic to our program so that when we check for the retirement age, if the user enters any number less than zero (a non-age), the program stops running and displays an exit message. Study this flow chart and see if you can adjust the program above such that the break; statement appears inside one of the if() controlled blocks. This means you'll have a line in your program that is simply:
break;
Note that you'll have two if() statements inside the while loop. We have one working already, so the key will be to tinker with the way the if() logic is implemented so that the users whose age is over 65.5 gets a message, if it's under zero, issue break;, and if it's neither of those two conditions, then conclude the user is under 65.5 and output the appropriate message.
The output of this program in action could look like this:

You try!
Before you peek at the code below, try adjusting our retirement program to add the break; statement. If you get stuck or want to check your work, feel free to do so:
Tinkering Ideas:
- Add logic into your program to ask the user about their savings amounts. Create a threshold that suggests that the user should not retire if insufficient savings exist. You can even give the user a figure, like "save $10,000 more before you retire" if they enter that they only have $15k saved.
- Create a mechanism for counting the number of folks who enter their age into the system and tallying the number who are eligible for retirement and the number who aren't. Print out the summary as soon as a negative age is entered (right before termination).
- Maintain a variable that tracks the average age of all the users who step up to our IRS computer. Each time a user enters his/her/their age, tell them their retirement status and the average age of all those who have used the program before.
You're now ready for this module's exercises and final mini-project! Remember--use your resources: this core concepts section, your book, friends, etc.
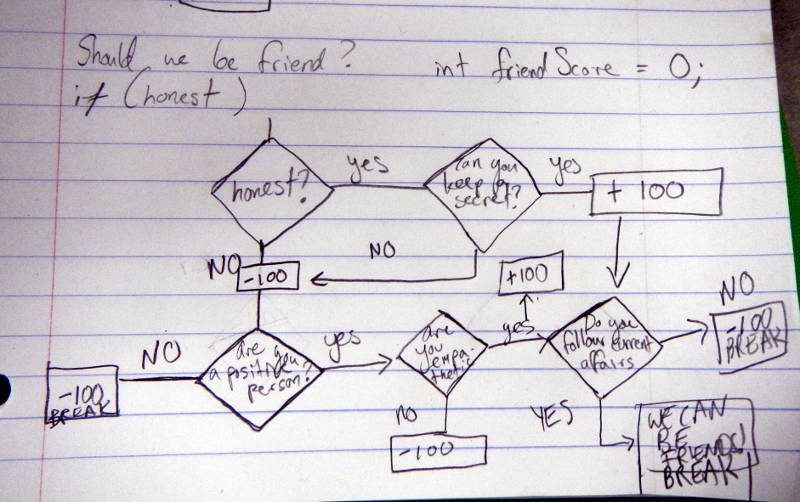
motorcycleExercise 0: Might we Be Friends? (Optional)
Exercise type: Written skill building
Paper diagramming of a friend compatibility checker
This is a preview of our chunk project: might we be friends? which comes up next.
Create a flow-chart of decision structures that could be used to gauge potential compatibility with a peer. Use at least five decision elements in your diagram. Think about what kinds of activities you like to do and how they might be weighted. Your last decision structure should be some sort of check against a score variable. If the score is over, say 50 points, then yes, you might be friends.
A sample:
motorcycleExercise 1: User Authentication Revisited
Exercise type: Essential skills practice
We explored how Java can be used to conduct user authentication in Module 4, Exercise 3 where you wrote a program that reads in two strings stored in variables called: username and password, checks them against the stored values, and displays a message dependent on the outcome of that check. This exercise extends that activity by incorporating while() structures to allow the user to attempt submitting the correct credentials multiple times.
highlightAuthentication Program Specification: Create a class Authentication.java which prompts the user for a single password (no username needed for your first version).
Requirement 1: If the user supplies the correct password, display a secret line of text which you have hard-coded into the program (could be named "secret" or "fortune" or "restricted information").
Requirement 2: If the user supplies the incorrect password, allow them to try again. After each incorrect attempt, notify the user that the data supplied is incorrect, the number of attempts they have made, and the number of attempts remaining.
Requirement 3: If the user fails to supply the correct information after all allowed attempts have been made, display a closing message and terminate the program--the secret still stashed away in the JVM and has NOT been revealed to an intruder.
Requirement 4: The number of attempts allowed should be controlled by a final int value (that can be changed before running the program) and the repeated password attempts should be controlled by a while() loop. Since we want to vary the number of attempts, do not "copy and paste" lines of code multiple times to allow for multiple attempts.
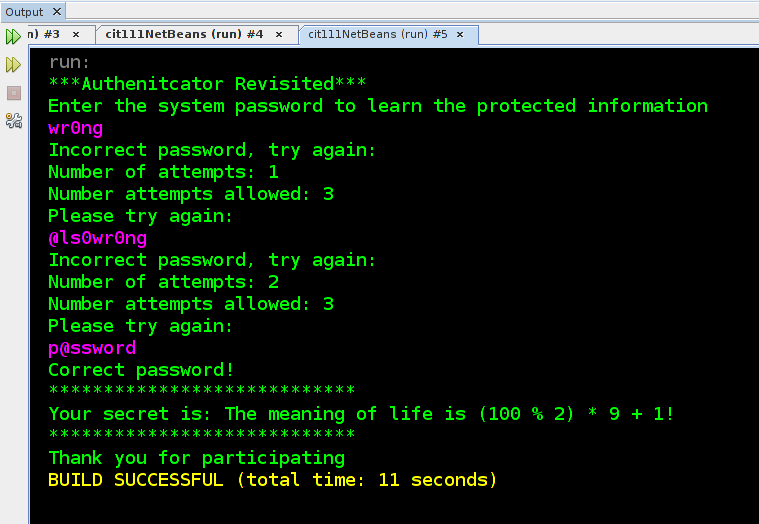
Possible program output
Study the following output of a program which meets these specifications. NOTE: Unless noted in the specification, the text of the prompts in your program need not match the sample output. In fact, you are encourage to completely customize your program as long as base specification allows such changes (you can always add "more" features).
Exercise Steps:
- Review your response to Module 4, Exercise 3 from the previous module. Don't copy and paste from your old program, however. That's setting yourself up for more debugging than you want and less practice than is desirable.
- Create a program flow diagram with boxes and decisions to use as a guide in your coding.. You've seen several examples so far in this module. HINT: Start with a simple flow diagram that only implements a simple if() statement that checks a password attempt against the correct password. THEN create another draft of the flow diagram with the while() loop and the inner if() statement which only displays "please try again" if the user has remaining attempts
- With your flow diagram all set to go, you are ready to start coding in Authentication.java. Don't forget to test your program throughly. Try entering too many wrong passwords. Try submitting "edge case" data such as negative numbers, no text at all, text with spaces, etc. Adjust your code as needed.
- Find a human user (preferably, somebody who is not you) to test your program and provide him/her/them with a small tutorial on how the modulus operator works. Then supply this user with the correct password and ask them to try to access their secret.
- Revise your system diagram in case you coded something differently than your original diagram
Design tips and helpers
- Remember, comparing String values require a more object-oriented approach to comparison since writing that uses the == operator works for numeric values since they are simple numbers stored in memory. Use the .equals(String b) approach described in Module 4, Exercise 3
- If you get quite stuck, your instructor wrote a "coding guide" in our git-hub repository that could be helpful. It's written based on the key so you can study the coding comments that guide you through each line to write. Note that this class file provides a very straightforward structure for creating this program but is specific to your instructor's solution. There are several roads to Rome in Java.
Check your work against a sample solution
![]() AuthenticationKey.java on GitHub. Remember, please write your own code and only use the samples as a guide. If you copy directly from the key, please note this in your comments.
AuthenticationKey.java on GitHub. Remember, please write your own code and only use the samples as a guide. If you copy directly from the key, please note this in your comments.
Extension ideas:
- Many security systems today implement what is called "two-factor authentication" which involve checking two forms of identification in order for the user to access restricted materials. This system often requires that the user "know something" like a password and "has something" like a mobile phone with a unique number. Check out the wikipedia article on multi-factor authentication . Adjust your Authentication class to model requiring the user to enter a second form of identification if the password supplied is correct. We don't actually have the knowledge to implement a finger print reader, for example, in Java. So use println statements or another user input to model requiring a phone passcode, or swipe of a key card.
- Adjust your code to store each of the user's password attempts for the security log. We want to be able to look through all the attempted passwords to see if the user was "completely guessing" or was having trouble typing the known password accurately. Create additionaly variables that store up to three password attempts. Display the attempts after the third password is attempted.
- Implement a system that requires a username and a password for "logging in." Create two user accounts, each with a different secret fortune. Demonstrate this function by giving a peer one of the two logins, and you retain the other. Create a system to logout after seeing one fortune and allow your peer to login after you.
motorcycleExercise 2: Simulating manufacturing quality monitoring with a random number generator
Exercise type: Teacher-guided coding
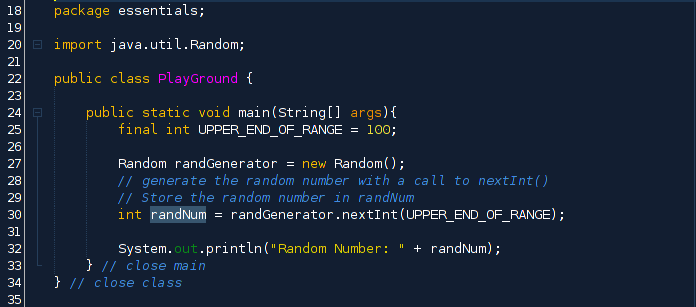
Quick primer on Java's random number generator class
You'll be generating random numbers in this exercise. Study this simple program that uses the java.util.Random class to generate a random integer between zero and the upper bound of the range (exclusive upper bound)
Specification:
We have seen this neat tool which simulates a manufacturing process quality monitor before in Module 2. We used this as a sample chunk of code to import from GitHub. Now that you have while() and if() blocks under your belt, try coding that class on your own using your new skills. Study the program specification, sample output, and design steps below to complete this exercise.
highlightAuthentication Program Specification: In a file called QualityControlOnMyOwn.java, create a program that stores a quality threshold, maximum unit quality, and units to make final integer variables to control the simulator
Requirement 1: Simulate a manufacturing process that is assessed by comparing a produced unit's quality score generated by a random number generator against the quality threshold. If the unit's quality is below the threshold, display a message to this effect. If the unit meets or exceeds the threshold, display an appropriate notice.
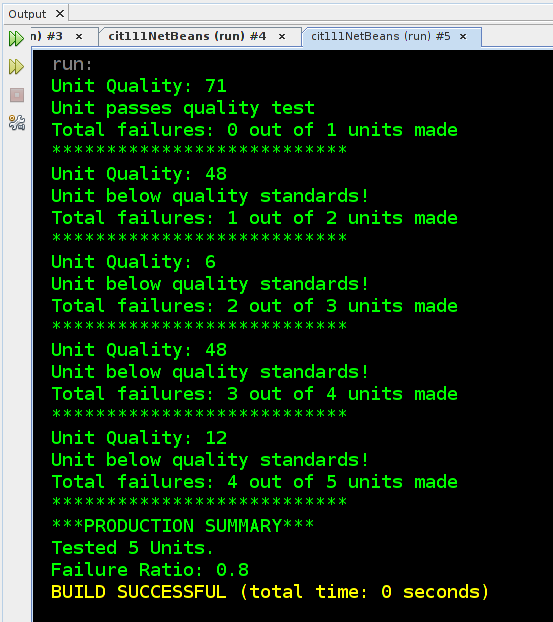
Requirement 2: Each time a unit is produced, display that particular unit's quality, the result of its quality test, the total number of failed units in the process so far, and the total number of tests conducted.
Requirement 3:Using a while() control structure, generate the hard-coded number of units, displaying the result of each test as the loop iterates.
Requirement 4:After the specified number of units have been tested, display a summary of all tests, including a failure rate as a percentage of total units created and tested.
Sample quality control output
The following is the output of a program that meets the above specification. Remember, your program may differ in its specifics. The goal here is to meet minimum program specification accurately only--how you get there is the coder's design!
Create a basic program logic flowchart
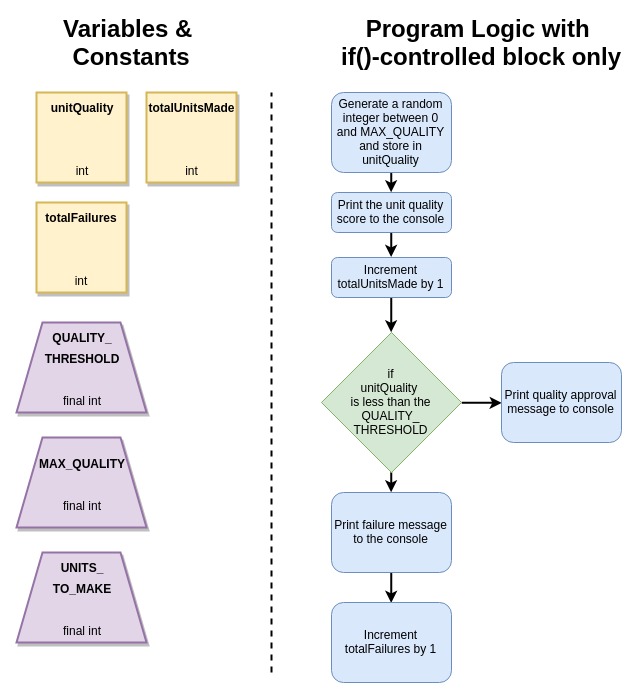
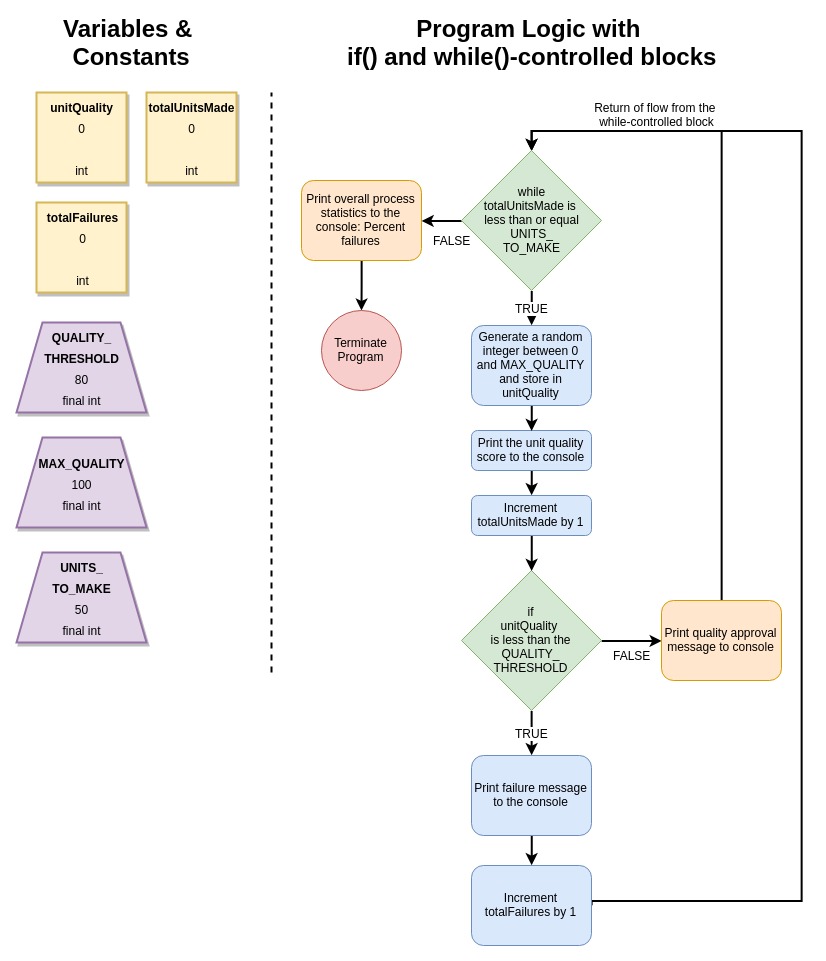
- Brainstorm the variables and constants that we'll probably need to create a given number of units of a product and check their quality against a quality threshold. List constants in trapezoids and variable values in squares.
- Create a flow chart of the basic if()-controlled block that checks the unit quality against the quality threshold and decides if a quality failure has occurred.
- Add in the functionality of looping through this quality check process until the specified number of units have been produced. This means adding a while()-controlled block that will execute as long as the total number of units produced is less than or equal to the desired production quantity.
Check your code against a sample solution
![]() QualtiyControl.java on GitHub. Remember, please write your own code and only use the samples as a guide. If you copy directly from the key, please note this in your comments.
QualtiyControl.java on GitHub. Remember, please write your own code and only use the samples as a guide. If you copy directly from the key, please note this in your comments.
Extension Activities (Optional)
-
Many automated manufacturing systems must decide if the machines themselves are property assembling the product to a specified quality. A key way that the system is monitored for proper functioning is by tracking the number of consecutive failures. Using statistical modeling, it is known that if 8 consecutive units are failures, the machines need to be checked and adjusted.
Build functionality like this into the quality control program you created above. Create a new constant that stores the number of consecutive failures that would result in a system shutdown. Also, create a variable called consecutiveFailures which stores a running count of how many failures have occurred one after another. Remember, if there are 3 consecutive failures and then a "pass", the consecutiveFailures counter must be reset.
Finally, create a display system for notifying the system engineer that the machines need attention. - Upper management wants to have regular reporting concerning the average quality of units produced. Create this functionality by adding additional variables that can facilitate tracking the average unit quality across all units manufactured. Display this summary data along with the count and percentage of failures each time a unit is checked.
buildModule Mini-Project for submission and sharing
Exercise type: Culminating Activity
Here's your big chance! You've learned a bunch this module and now you're ready to put those skills to the test with this programming exercise. Notice that there have been many examples of similar code in the above exercises, but none of them combines random number generation and password-like authentication--which is the goal of this activity. Follow the program specification carefully, and once that is met, feel free to add the extension requirements into your code. Follow the submission instructions carefully.
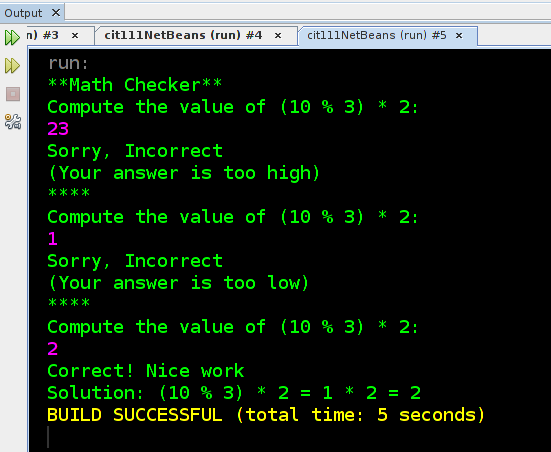
highlightQuiz Program Specification: In a java Class named appropriately, create a program that asks the user for the answer to a math problem displayed on the screen with feedback from the computer. The math problem can be tricky and involve correct application of order of operations, etc. Review the list of operators in Java if you need a refresher.
Requirement 1: Hard-code a math problem and the correct answer into the system with final int-type variables. (An extension activity will encourage you to generate the question randomly, but that's not required at this level of experience). Display the question to the user.
Requirement 2: Prompt the user to compute the answer and enter it into the console. If the user enters the correct answer, congratulate them on their mathematical prowess.
Requirement 3: If the answer is incorrect, tell the user if the answer submitted was above or below the correct answer and allow the user to try again.
Requirement 4: After 3 incorrect attempts, display the correct answer AND a small prompt about how it was generated.
Sample solution output
Study the following output to use in your creation of a program flow-chart and source code
Submission steps:
- Study the specification and create a flow-chart of your program's logic. Use paper/pencil or use a computer-based tool such as the amazing draw.io tool that's an extension in Google Docs (and is used to generate all the flow charts in these tutorials).
- Code your program according to you flow-chart. Test the program rigorously and make sure there are no flaws in logic.
- Revise your flow-chart based on any changes you made as you implemented your original logic.
- Photograph or export your flow chart into an image file named whose name starts with the same text as your .java file with the characters "_flowchart" appended to the end. So if my .java file is Quiz.java my flow-chart image would be Quiz_flowchart.png.
- Upload both your source code file and flow chart image to your personal GitHub account and make an entry in our course's code submission index. NOTE: Since you have two files to submit, fill out the first line completely for your source file and then take a second row where you list your image as the output. Make sure to have direct links to both files in your repository for easy review by the instructor and more importantly, other java learners.
Extension ideas:
- Refactor your code to present incrementally more difficult questions as the user gets questions correct and offers less difficult questions if the user gets questions wrong. The program should tabulate an overall score for the user and display it at the end of the program. Use if() structures to determine which question should be given next. This functionality of responsive exercises is the foundation of many modern, paid-for-bigtime, online learning environments which attempt to tailor content to the needs of the user.
- Edit this program so that it does math on some simple integers. Figure out a way to randomly generate a question with Java's random number generator (see the Quality Control Exercise). This is an excellent extension that's really useful for actually learning math. Beginning educational tools for math that ran on computers started out this simple: Display a problem, give feedback on the answer immediately. Finally: Then find a person who is learning math and have them give it a try. Edit your interface after you watch them use it for a bit.