Computer networking stations
wb_incandescentIntroduction
Explore both the technical and physical aspects of computer networking with four exciting stations! Use the buttons at the top of this page to load guides for each station
Station 1: IP Addresses
|
|
IP Addresses: Your first resource for this station is the excellent article on IP addressing on the Wikipedia Subnetworks: Your second resource for this station is the excellent article on subnets on the Wikipedia |

- Dedicate the first 5 minutes of your time at this station studying the wikipedia article linked above and respond to the basic comprehension questions on your response sheet
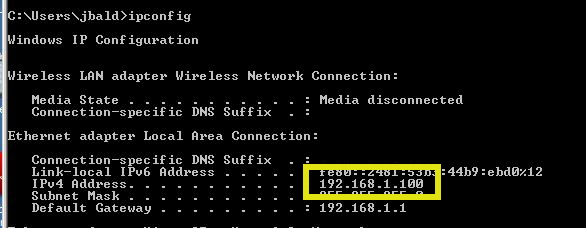
- We want to learn about the addresses used to route packets to computers at CCAC. To do this, use the table called "IP Address record" on your response sheet to look up the IP addresses assigned to various computers around the facility. To do this, open the Windows command prompt and type the simple command ipconfig.
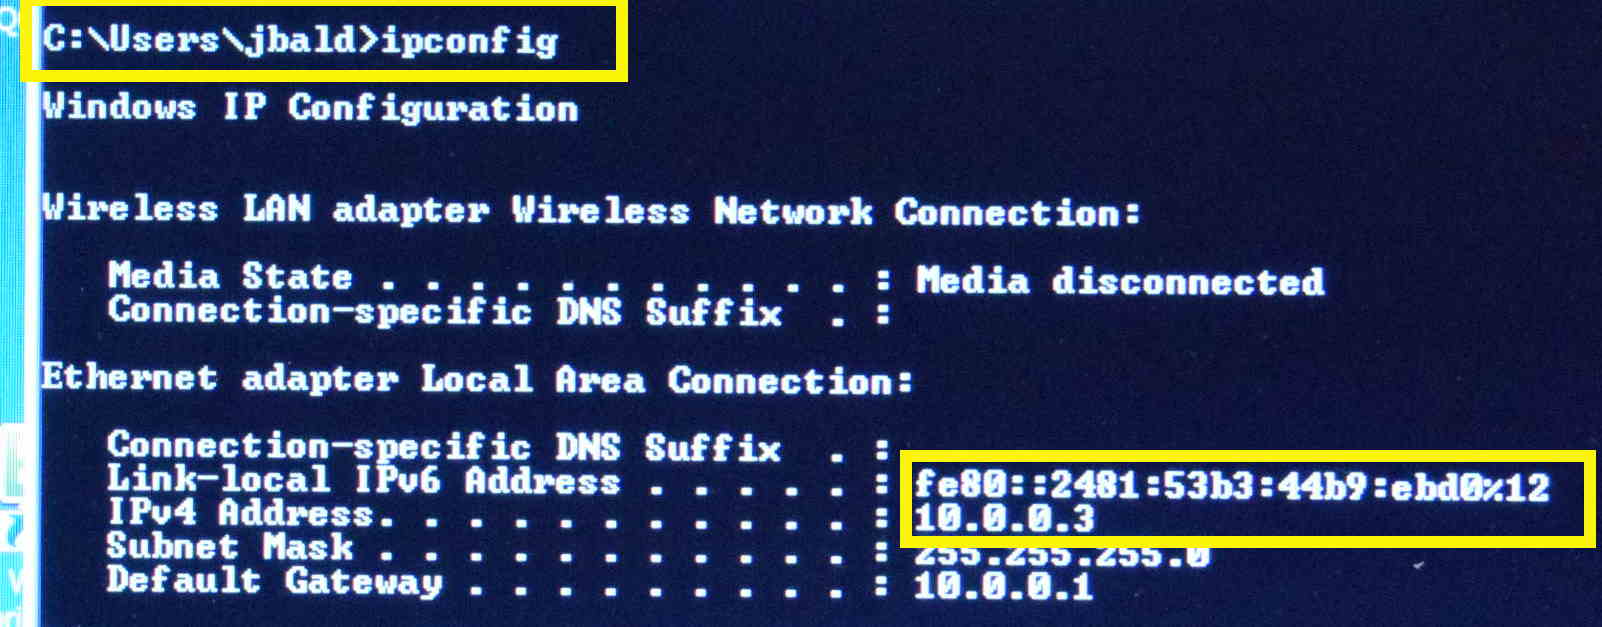
- Using the sample screen shot below as your guide, record the IPv4 address assigned to the computer you're checking. Record this information in the table. Choose a consistent way to record the computer/name/id (It should NOT be the username of the person logged in)
- Visit at least TWO computers in at least THREE different locations in the building: such as this solar lab, our "normal" classroom S2113, and the open lab downstairs. You may have to log into several computers or you could ask somebody already loogged in to record their computer's current IP address
- Respond to summary questions 1 and 2 which ask you to pause and analyze the IP addresses you gathered.
Sample command and ouput for ipconfig on windows to look up the address given to a particular host
Station 2: Wireshark
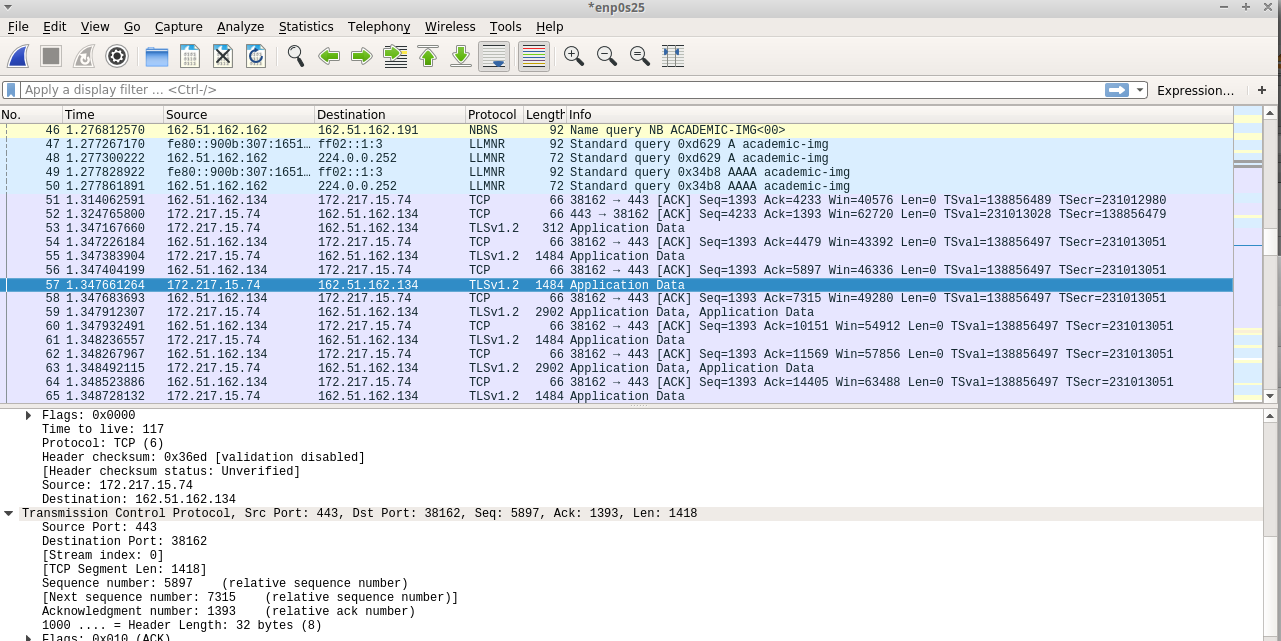
We can use software to capture and display all the traffic that can be "heard" on a network. One popular program for doing this is called Wireshark and was written by people working for free and shared with the world on the Internet.
- Dedicate 5-10 minutes to read and digest a few sections of the official wireshark documentation linked above. Focus in on chapter 5 about live packet capture.
- In order to use wireshark to capture packets, we need to setup a network on which it can listen for packets to capture. We'll do this using a simple home-grade router, which in our case we'll just use as a switch to send packets to computers on our own little network. Do this by connecting the capture computer to one of the four Linksys router ports. Do not connect any computer in this exercise to the port labeled "internet".
- Connect the other available laptop to any of the other numbered ports on the back of the router
- With wireshark open, click the fin icon in the upper right and begin capturing packets. You'll notice they come in waves. With Wireshark recording, try using a web browser to try to navigate to a website. (The computers are offline). You'll see different kinds of packets come through.
- Populate the packet capture table in your student guide and do any necessary research to discover more about each packet's protocol.
Station 3: 5 Cats in a cable?
- Dedicate 5-10 minutes to study the linked wikipedia article above about Category 5 cable and answering the reading comprehension questions on the student response sheet.
- Watch any necessary portions of the DIY youtube clip embedded below to learn the basics of how to install an RJ-45 connector to the ethernet cable found in front of you.
- Carefully use the tools in front of you to create an ethernet cable with correctly installed RJ-45 connecetors on each end of a length of cable about 6 feet long.
- Test your cable using the wire cable tester device found at the station. If each of the pairs listed lights with a flashing green light, it is correctly installed. Otherwise, you'll need to diagnose the error and fix it. When in doubt, stop and ask!
- Test your cable on one of the computers being used to explore wireshark to see if it actually works!
Station 4: Routers
Every single bit of network data we consume or produce travels from its source to its destination through a router--a computer responsible for directing network data to their destinations. Learn more through the article below:
- Dedicate 5-8 minutes to study the Wikipedia article on computer routing linked above and respond to the reading comprehension questions on your station response sheet.
Lab goal:
With the basics in mind, let's create a small network using a home-grade router, a laptop computer, and a mini-computer called a Raspberry pi. Remember, just like every house that wishes to get main needs a postal address that the mail person understands, every computer on a network needs an internet protocol address that routers on that network understand.
Most home-grade routers do the work of providing an internet protocol (IP) address to any computer that asks for one. The following steps will guide you through learning about how routers use IP addresses and MAC addresses to get data to and from computers on a network.
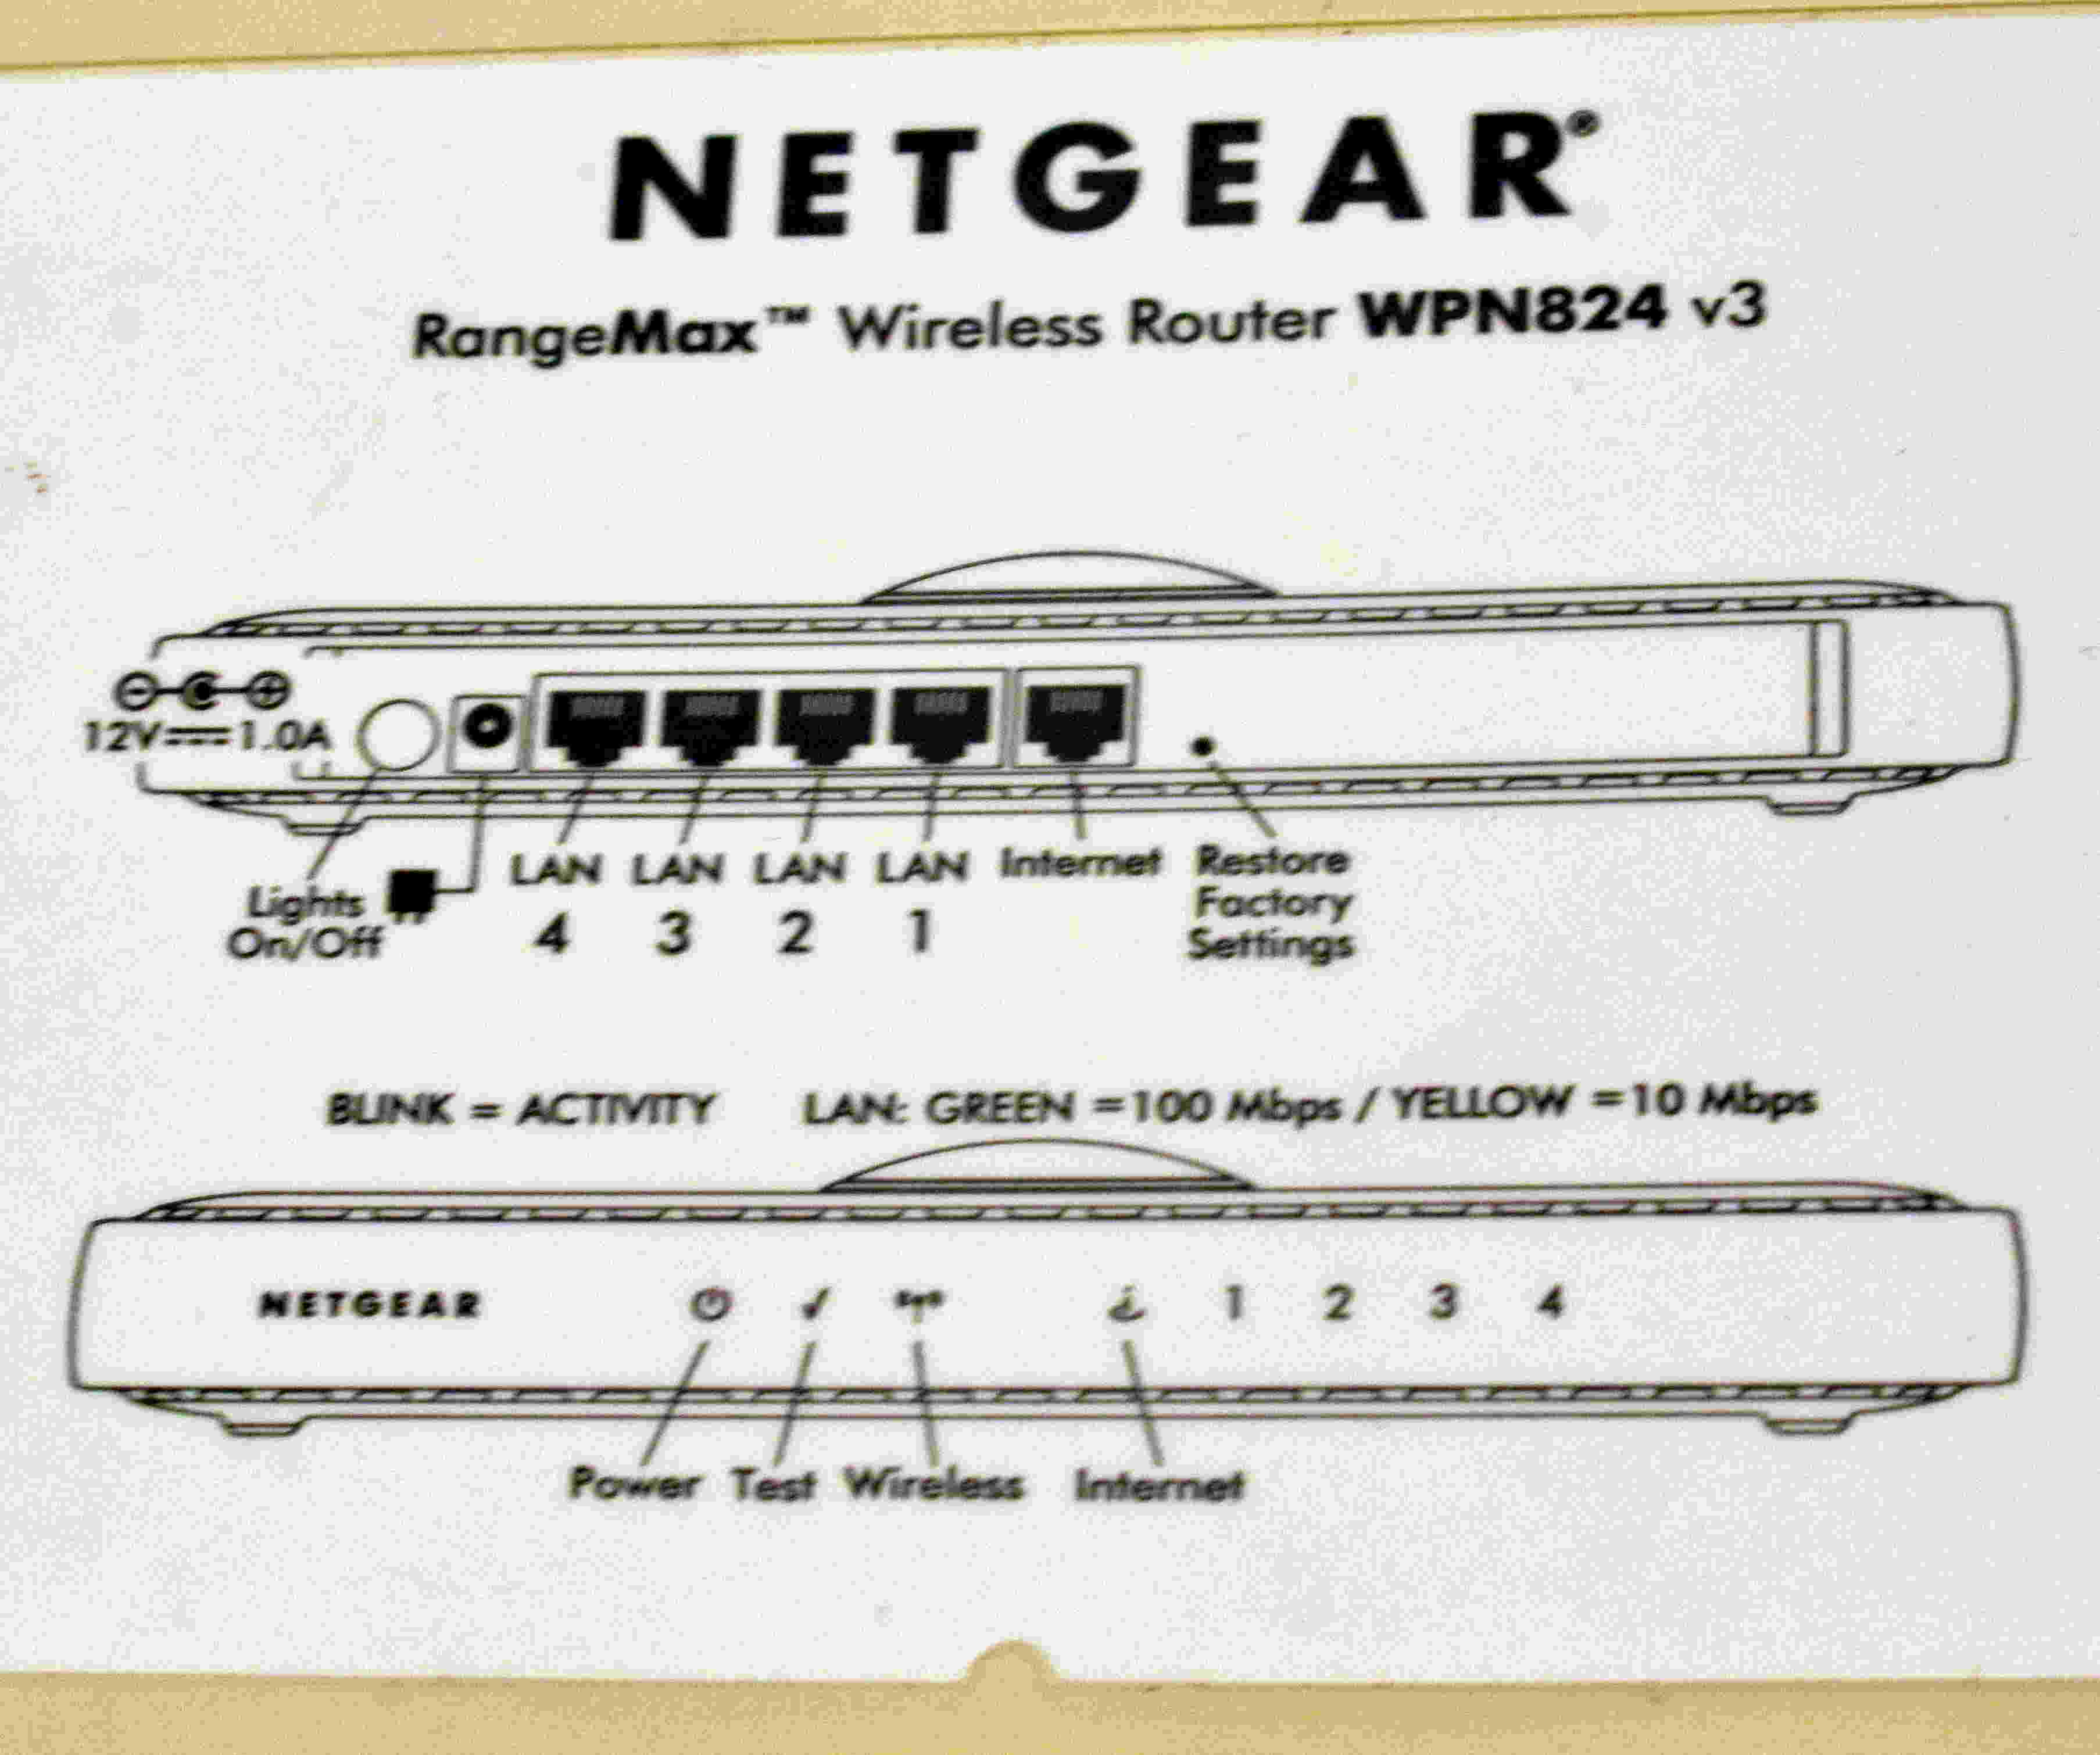
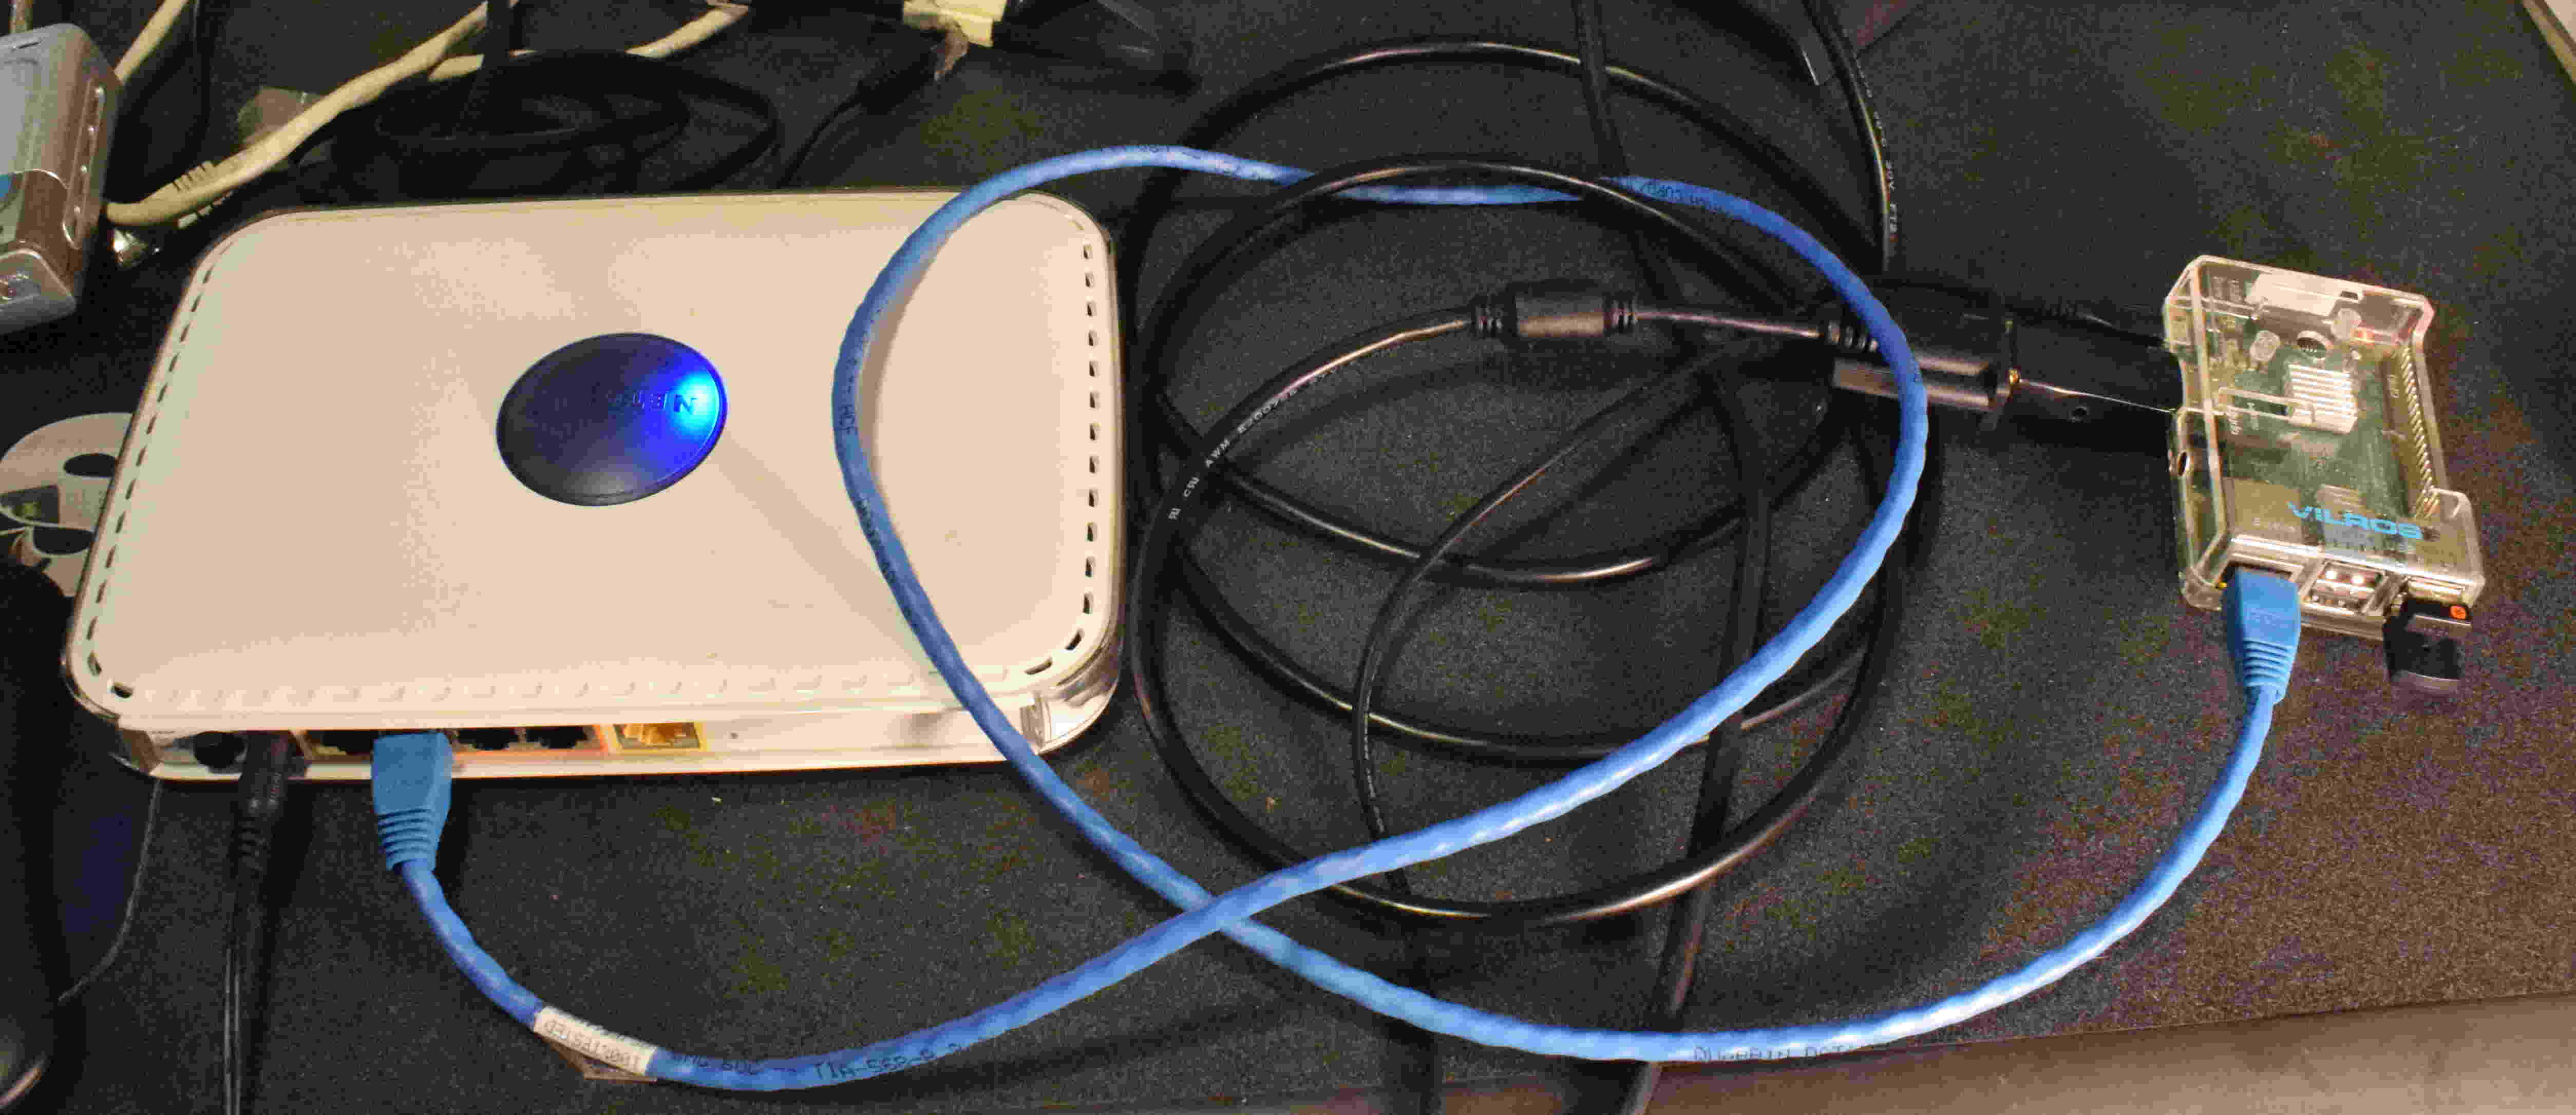
- Routers are computers with a special job. As such, we can connect to the router itself just like we might connect to a web server to access email remotely or play a game. To initiate this connection, we need 1) be working at a computer connected to the same network as the router and 2) Ask our computer to connect to the router using its address. To accomplish #1, we'll use the raspberry pi as our connecting computer and connect its network interface card to one of the router's 4 Local Area Network ports. Use Figure 1 and 2 below to guide you in completing setup.
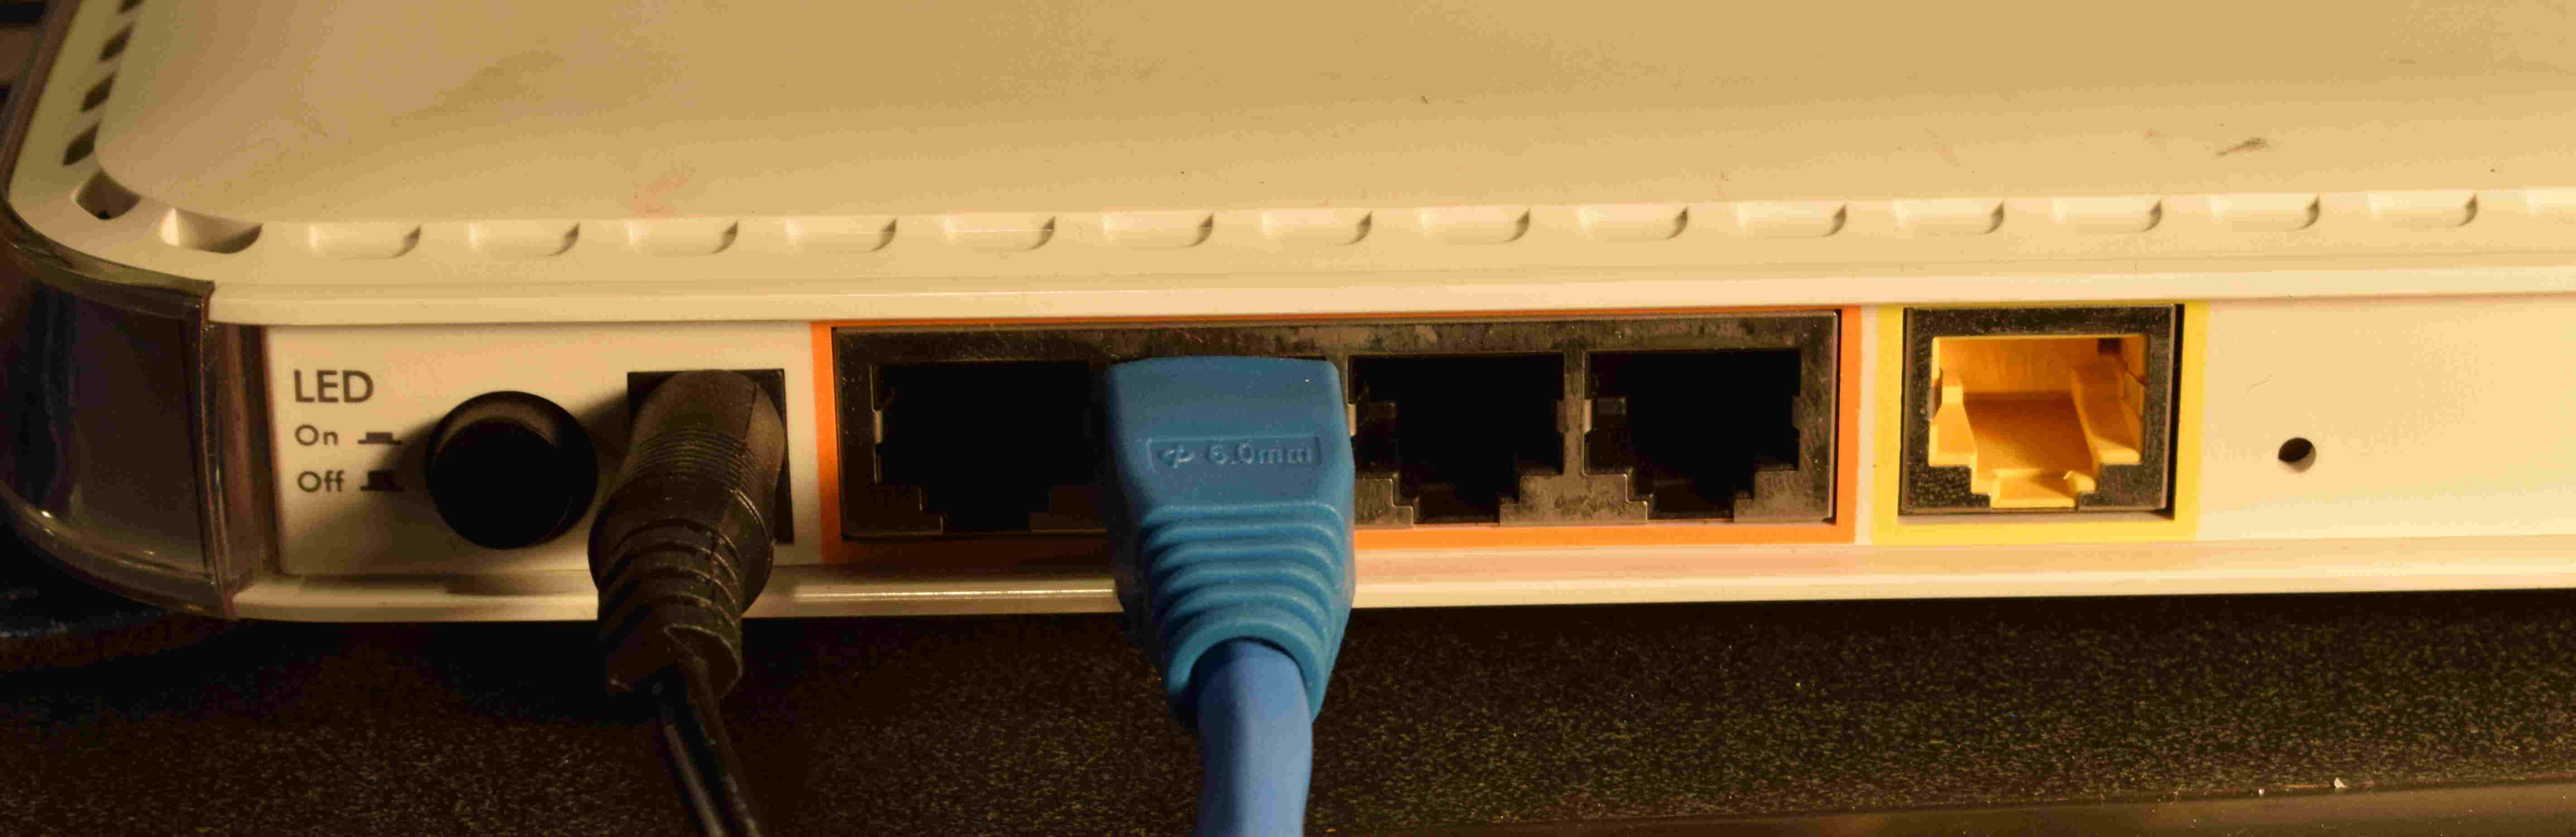
- Ensure that the Netgear router is plugged into wall power with the 12VDC adaptor. The adapter plugs into the socket on the rear of the router, ext to the button marked LED. The raspberry pi should already be on and logged into the graphic desktop. If not, ask for help.
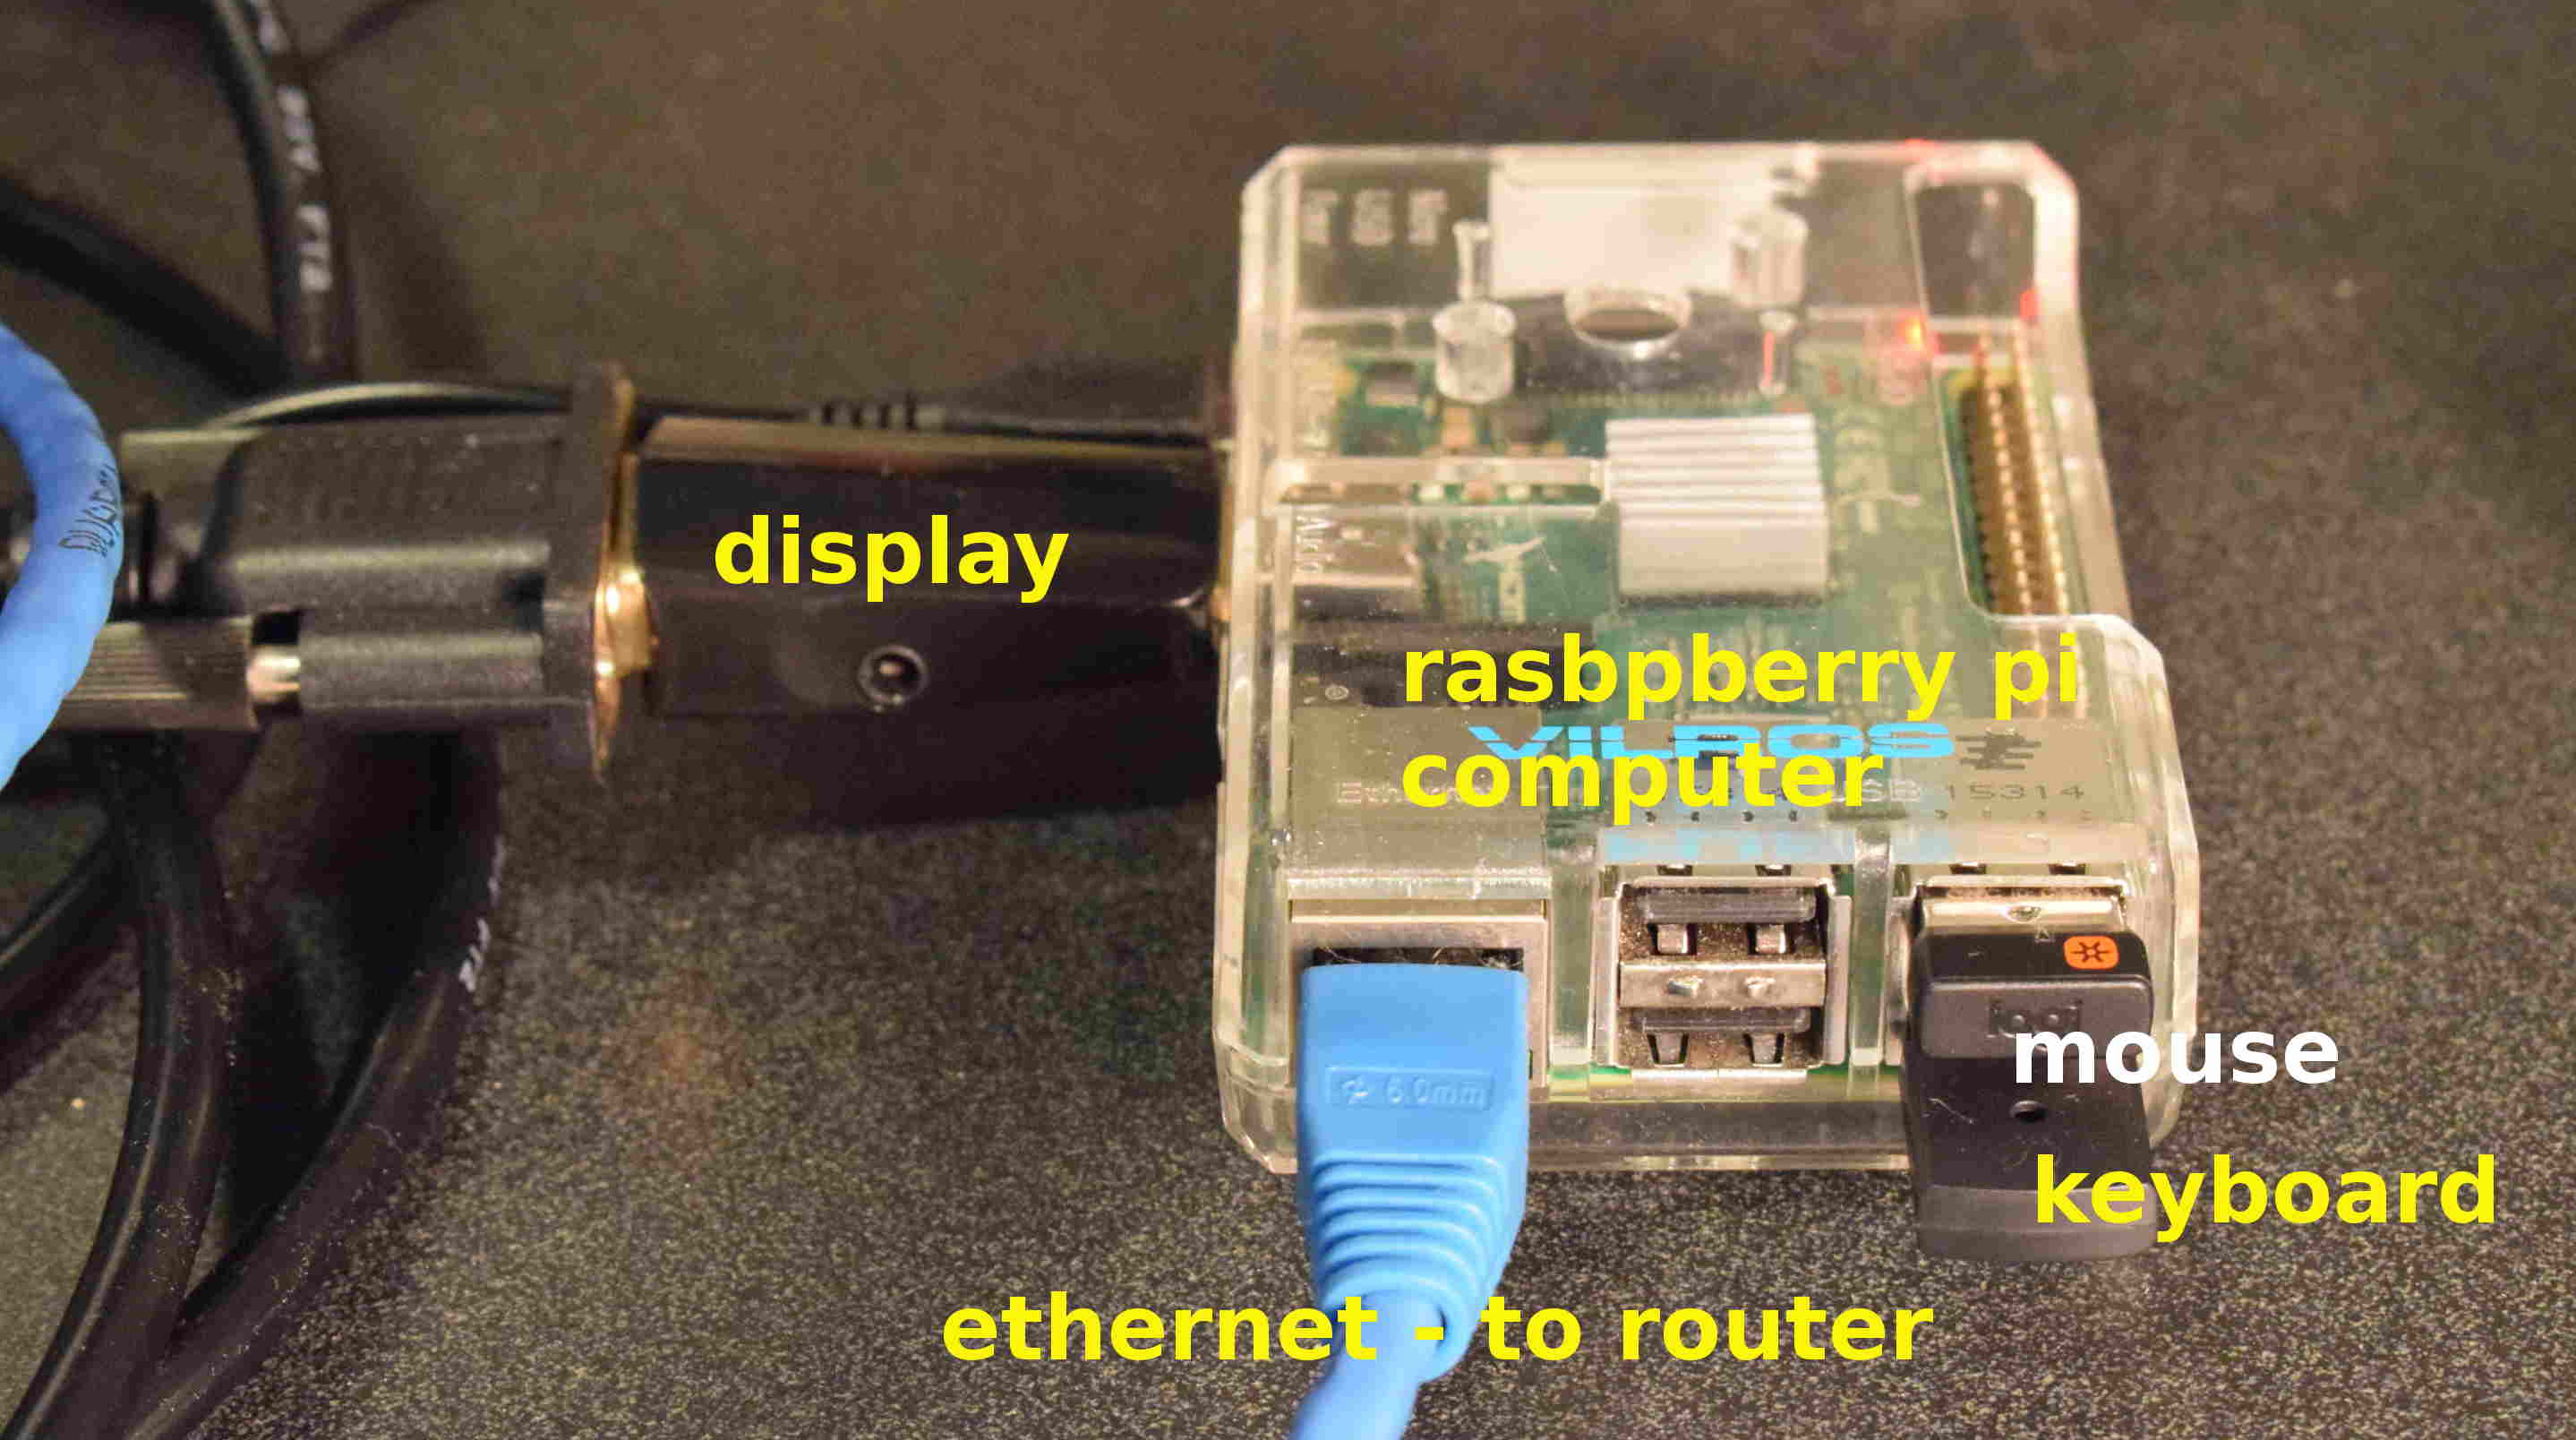
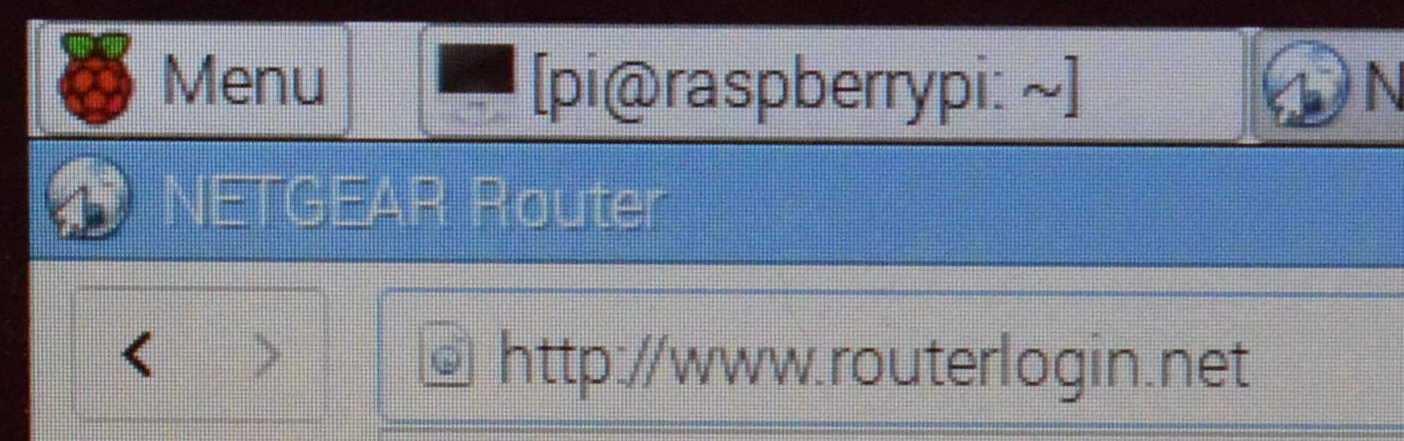
- We now need to connect to the router using a web browser on the Raspberry pi. You can access this by clicking the "start" menu equivalent on Linux which is the button with the raspberry icon in the upper right. Then navigate to Internet >> Web Browser.
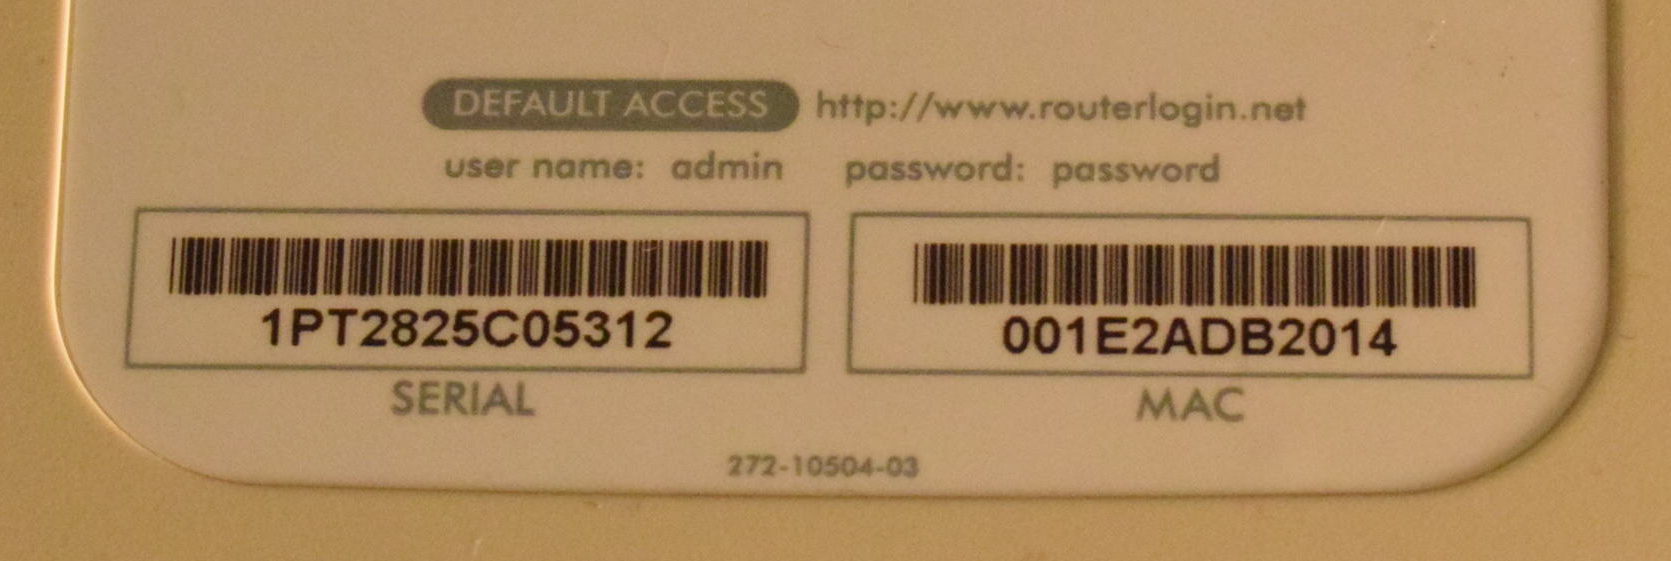
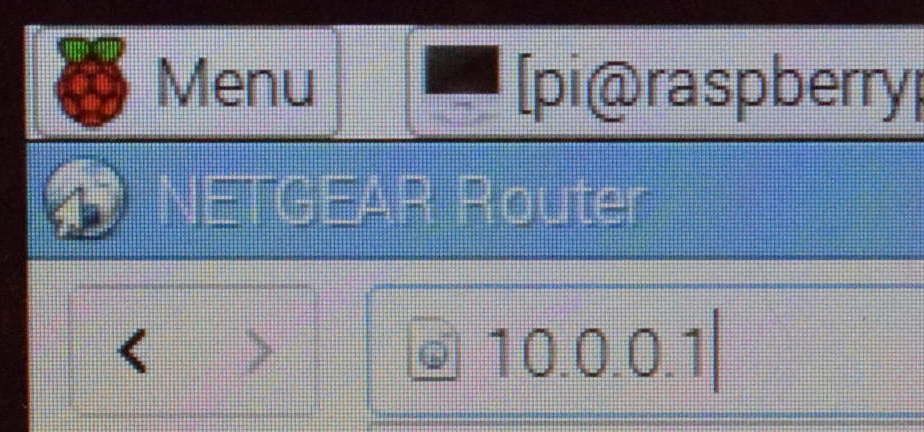
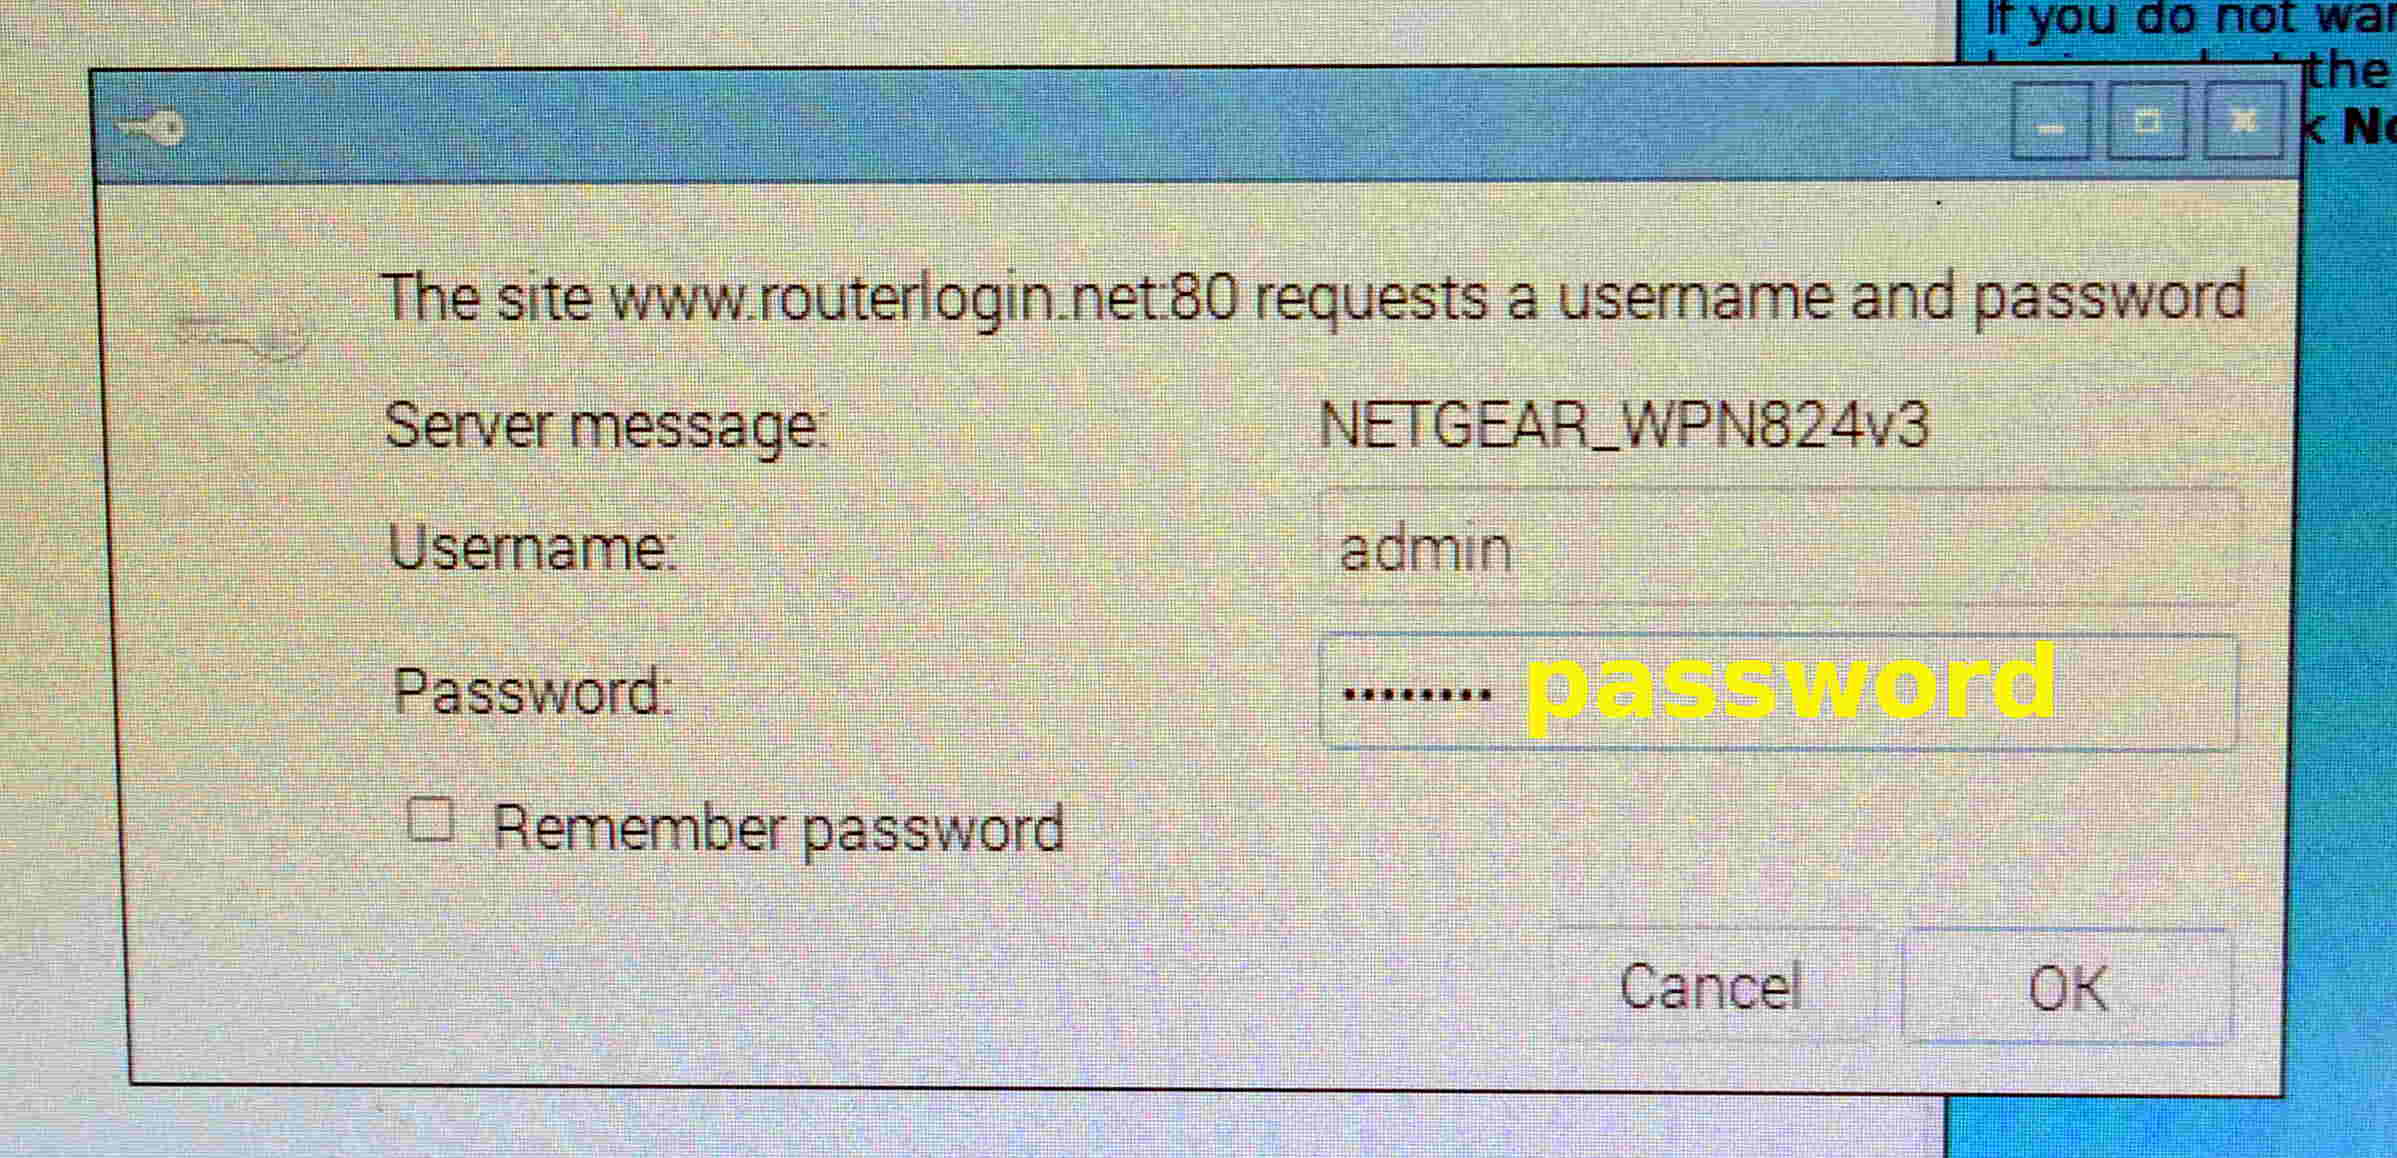
- Examine the underside of the router and find the URL (i.e. web address) of the router itself. Notice that this looks like it would be a website on the Internet--but really, it's just a name that the router will respond to when it processes a request from any computer trying to reach that address on the World Wide Web. Type this into the web browser on the pi. Enter the default username and password also found on the stick on the underside of the router.
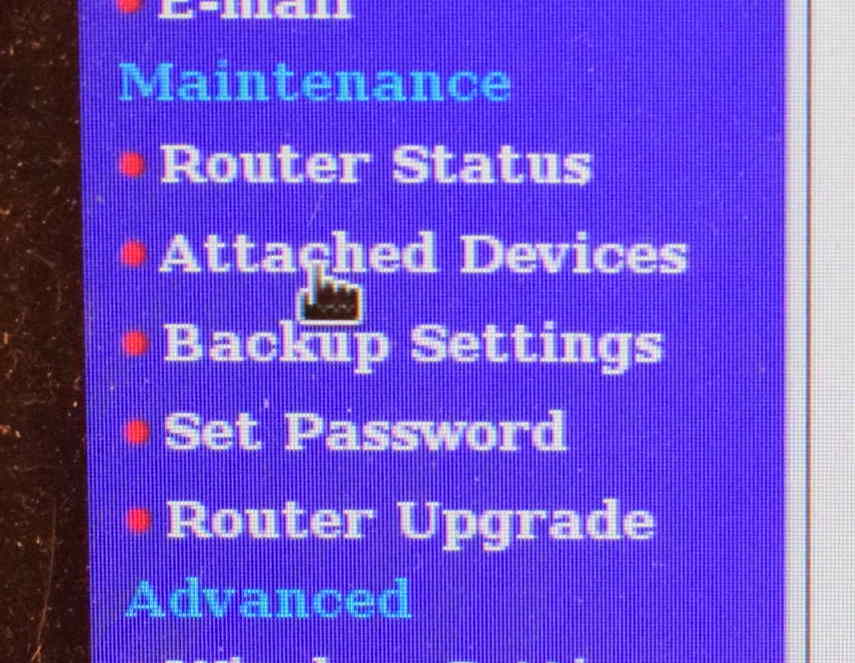
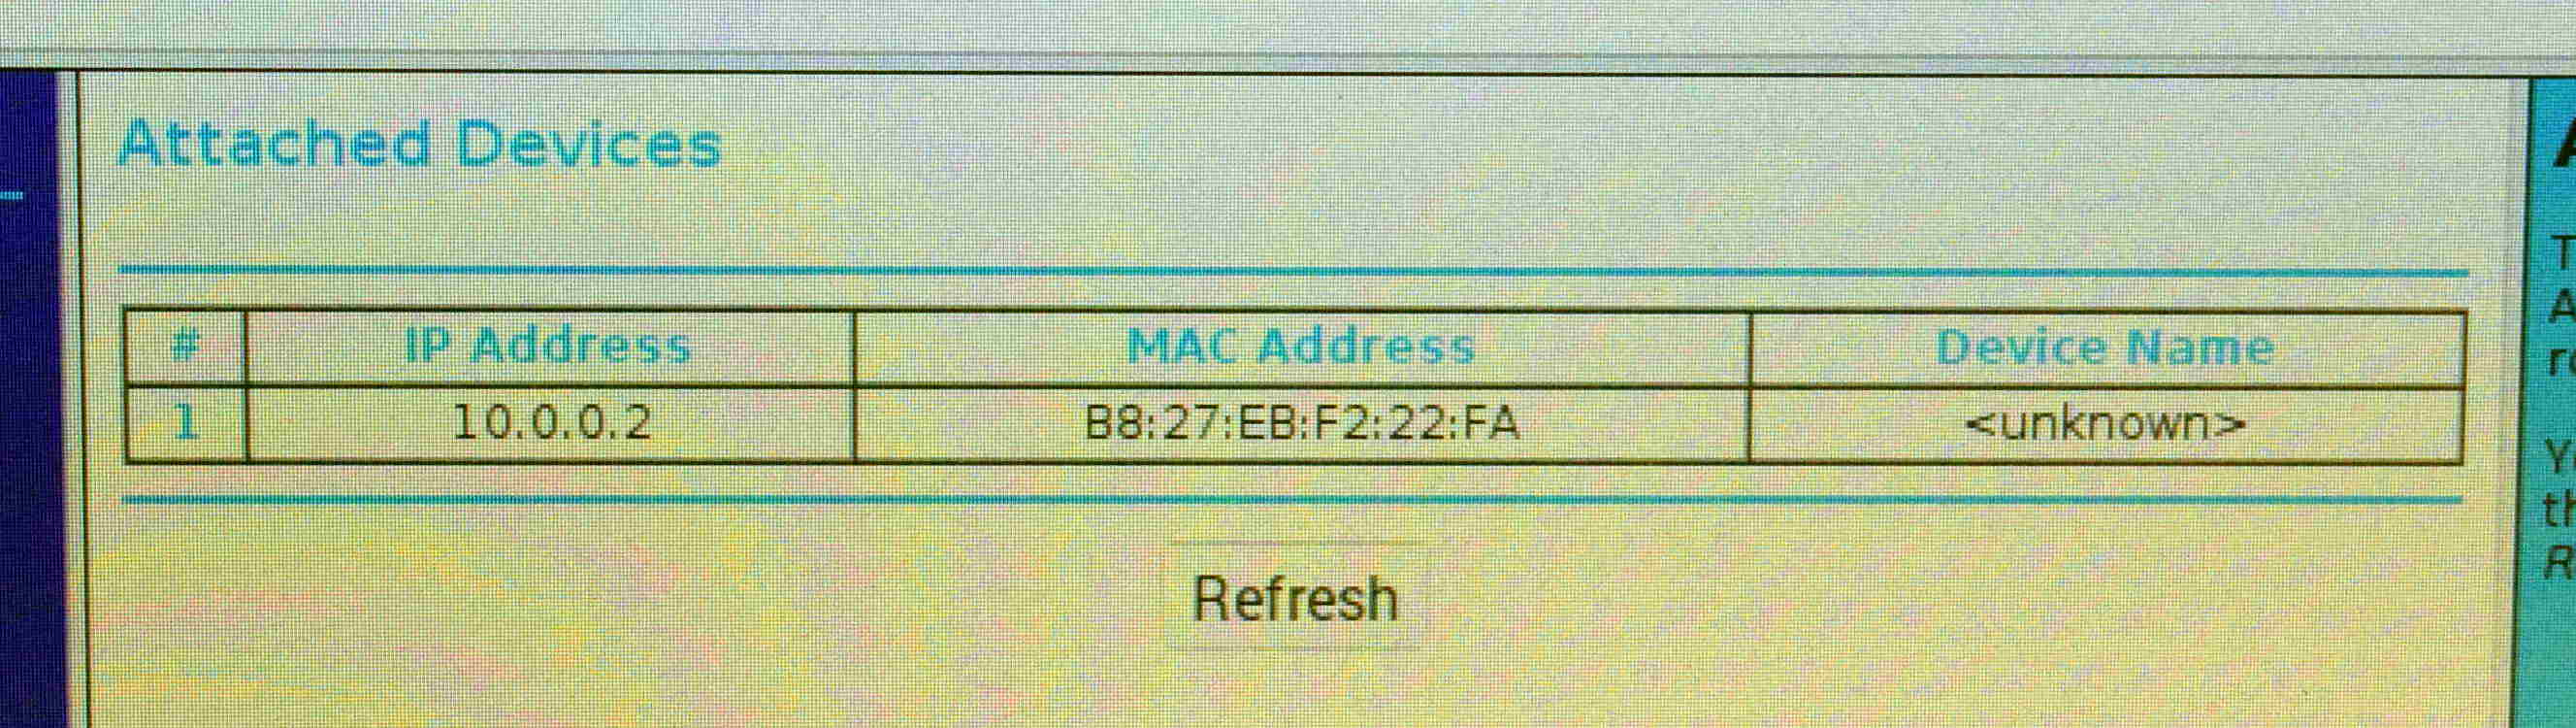
- When you're logged into the configuration settings for the router, take a few minutes and browse the settings menus available on the left-sidebar menu. NOTE: Click ONCE and be PATIENT. The router is a tiny computer, so it takes up to 15 seconds to load a single page. The web browser on the pi will NOT show any behavior or even a loading symbol once you click, so you have to restraint yourself and just wait. The pages (almost) always load eventually. We want to see what address the raspberry pi was given by the router. To do this, click the link "Attached Devices" link in the left sidebar. (And wait patiently). Note the single device in the table, its IP address, it's MAC (hardware) address, and the device name. Record your findings on your response sheet.
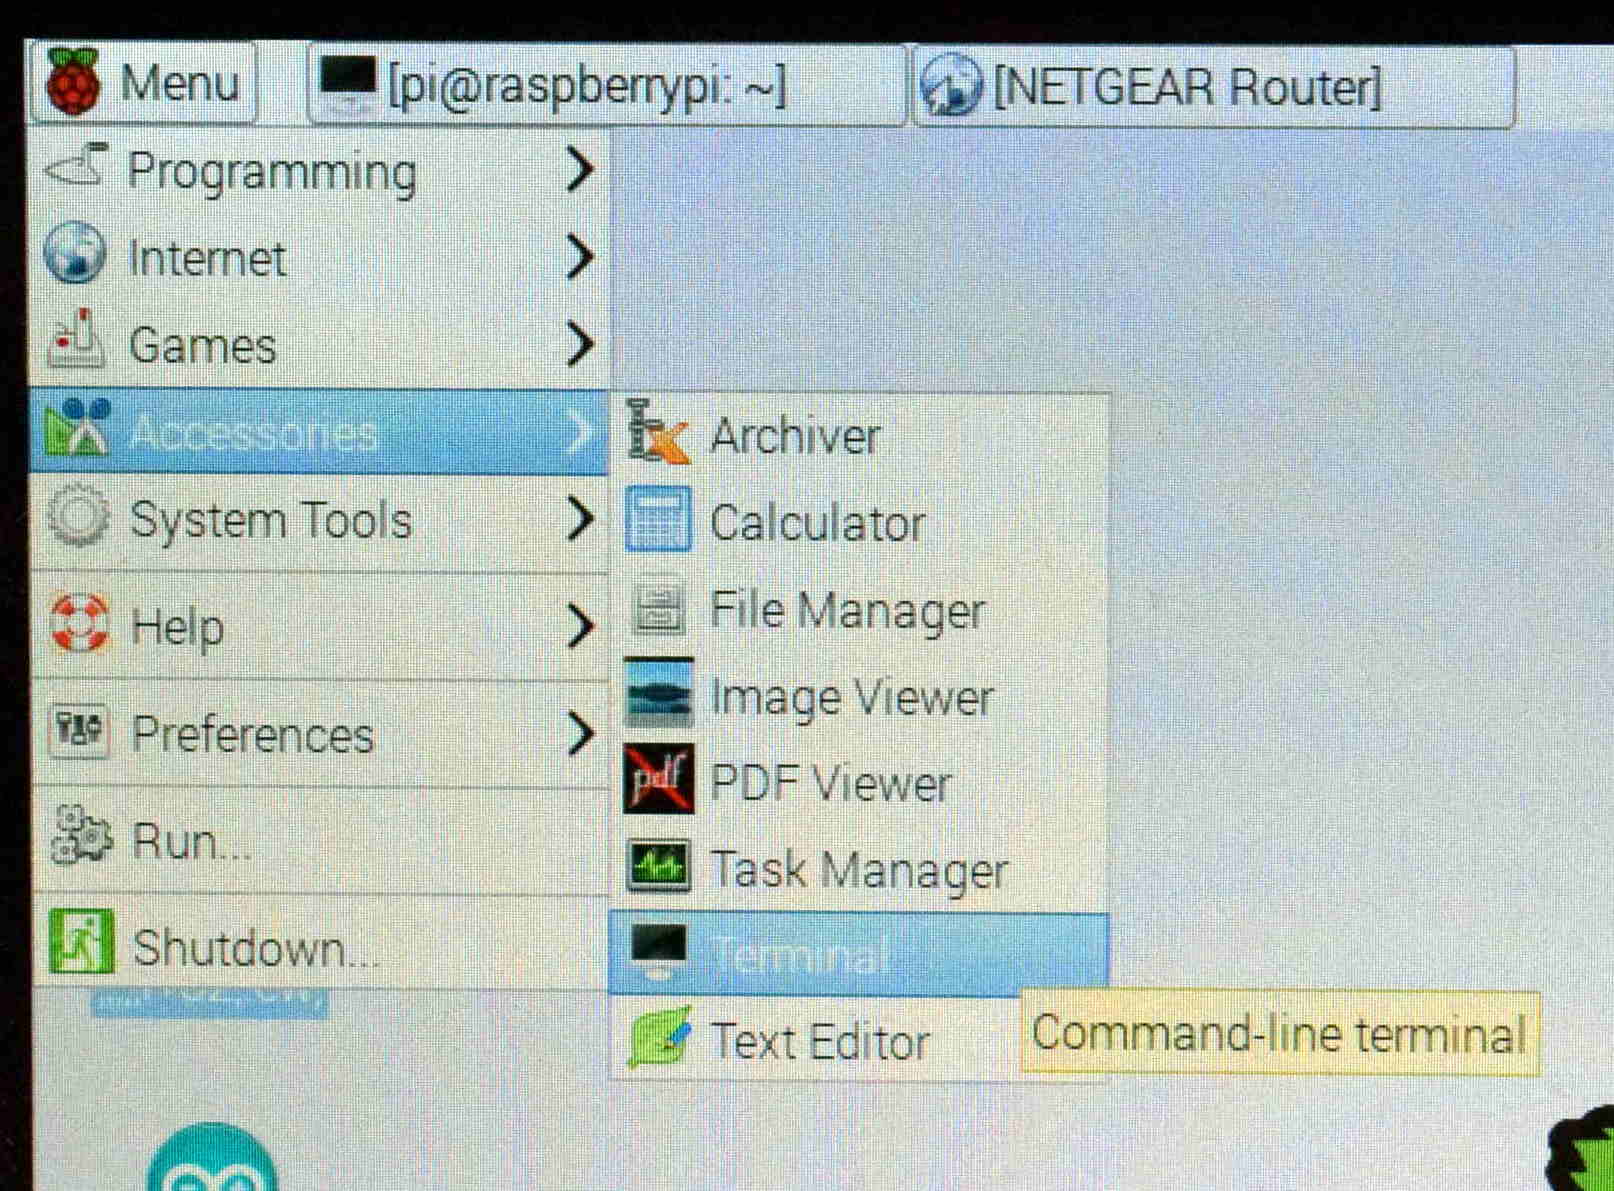
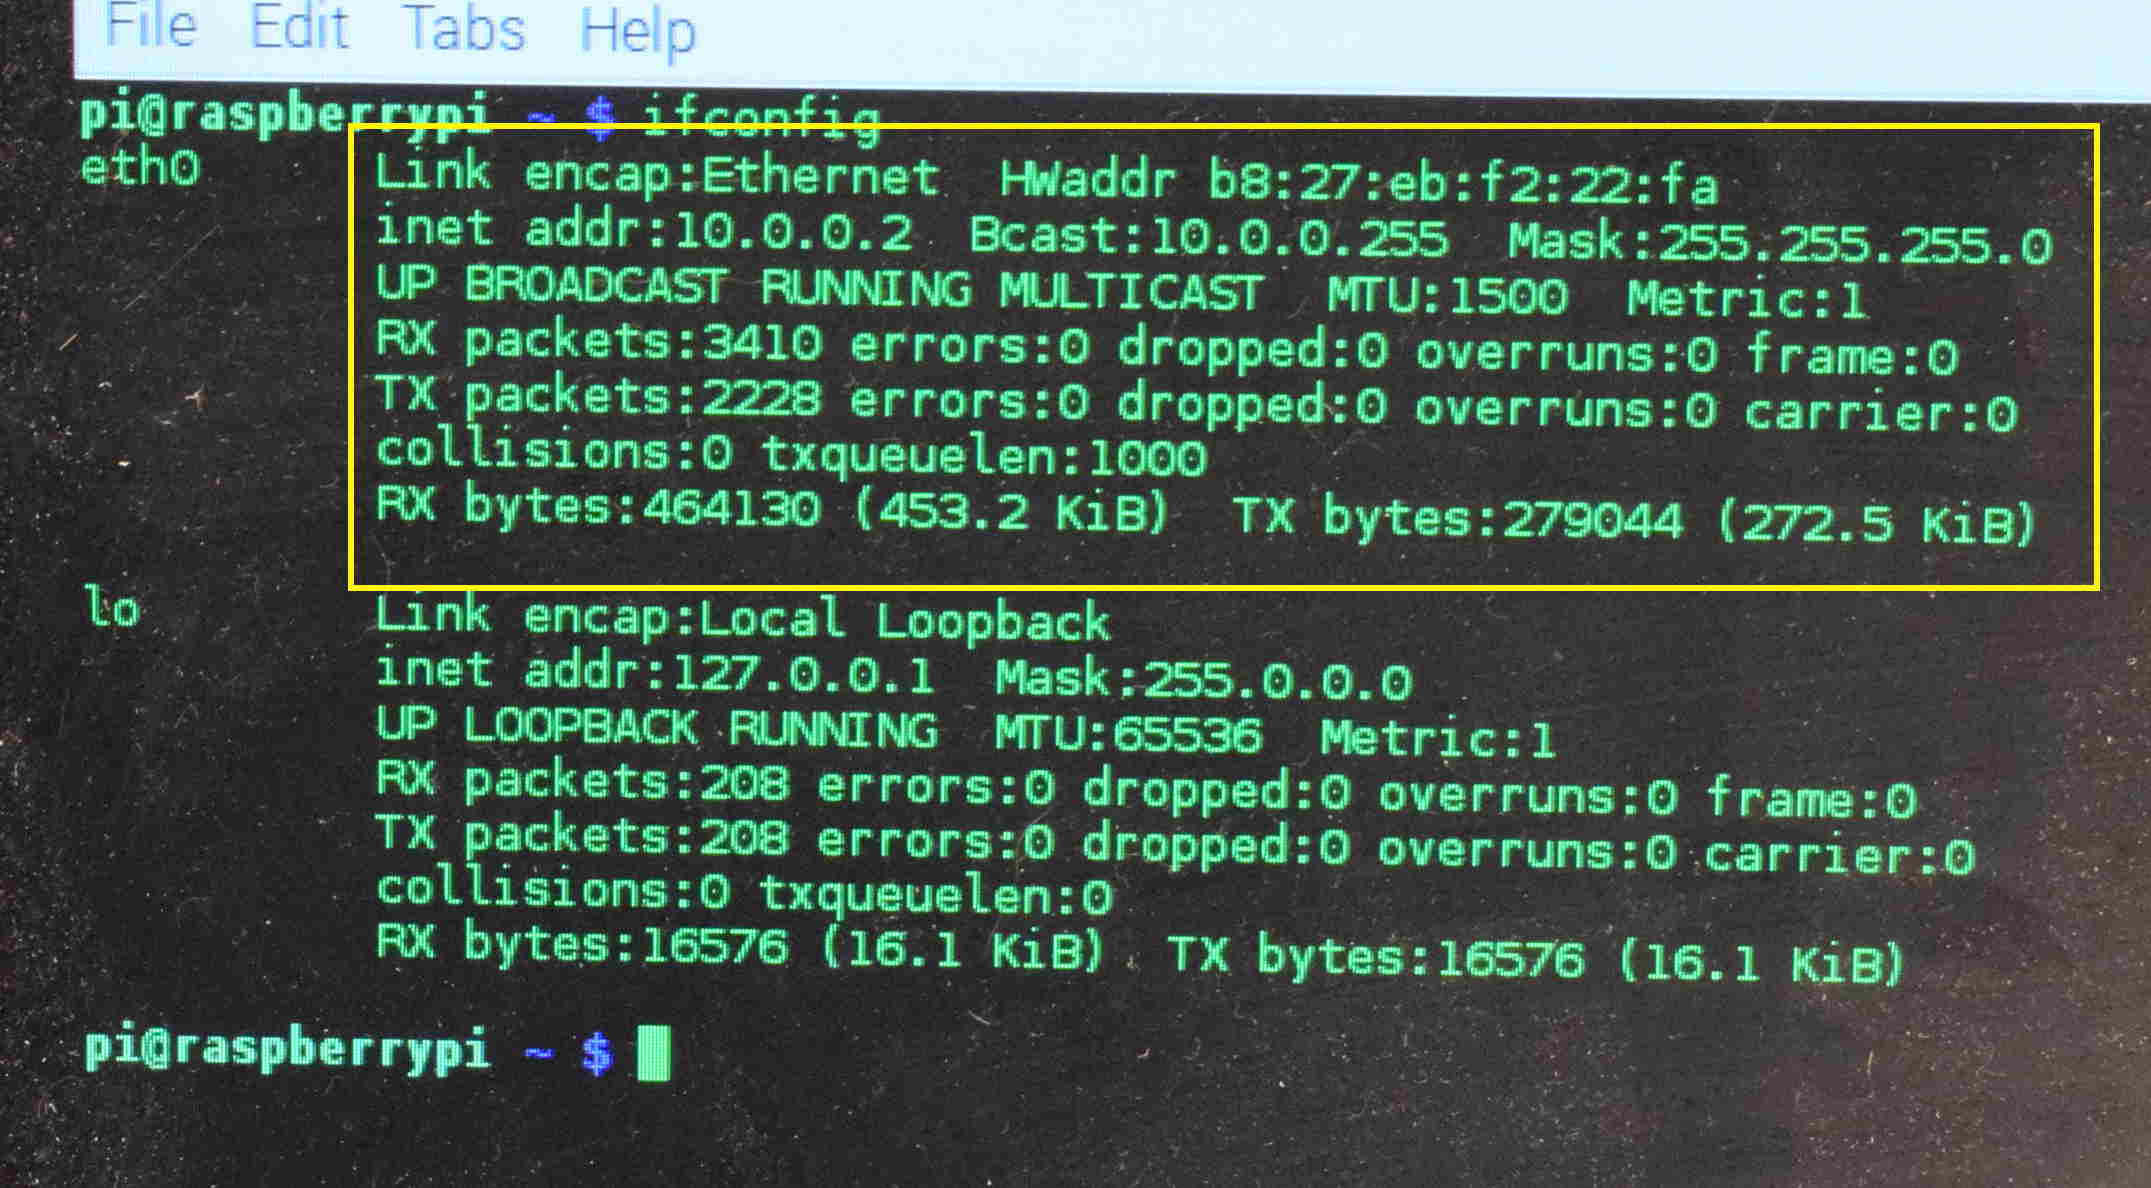
- We can also see that the pi knows that it's connected to the router. To do this, we can run a program called ifconfig using the Linux command line. Navigate to a program called "Terminal" on the pi by clicking the raspberry icon in the upper left >> Accessories >> Terminal. Simply type ifconfig and study the output. We see two devices listed, one called eth0, which is the ethernet adapter into which we've connected the router. The device called lo is the "loop back" address, which is basically the address of the pi itself in case the user wants to run a server and access that server on that very same device.
- Verify that the MAC address and the IP address of this connection is the same as that shown in the router Attached Devices table. Record information about how many packets have been received (RX) and transmitted (TX) using this interface in your student guide.
- Access TWO more pages on the router's configuration settings, and re-run ifconfig. How many packets were received over that interface to load those pages? How many packets were transmitted? (Compare the RX and TX packet numbers from your two runs of ifconfig). Record this information on your response sheet.
- We can add multiple computers to our little network! Disconnect one of the nearby Dell All-In-One computers from the CCAC network and instead patch it into another port on the rear of the Netgear router using a CATEGORY 5 cable created by one of your peers in the 5 CATS station. Refresh the router's Attached Devices page and record the information about the Dell computer in the table on your response sheet.
- Verify that the Dell All-In-One also agrees that it was given the same address. Access its network settings through the program called Command Prompt and run the command ipconfig and record the address located by the ethernet adapter.

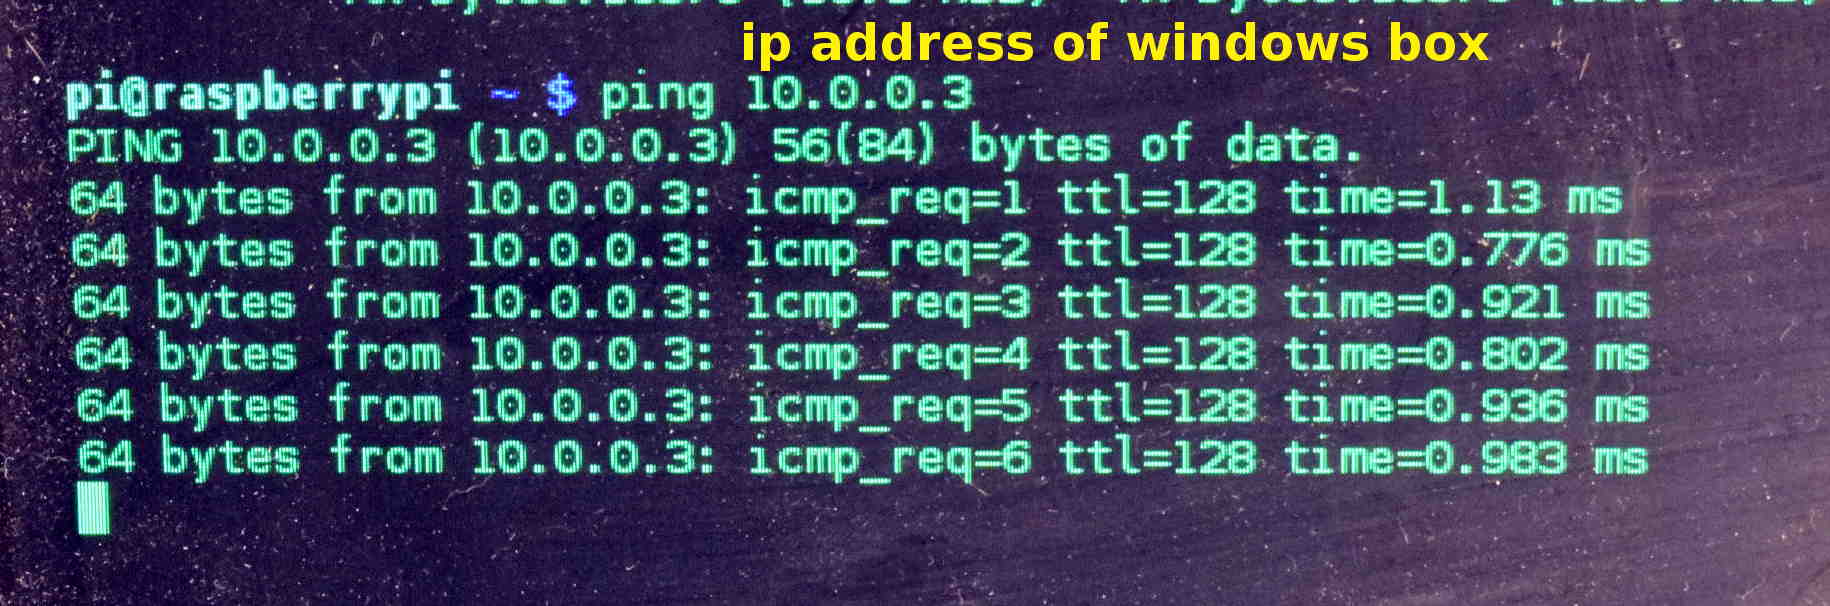
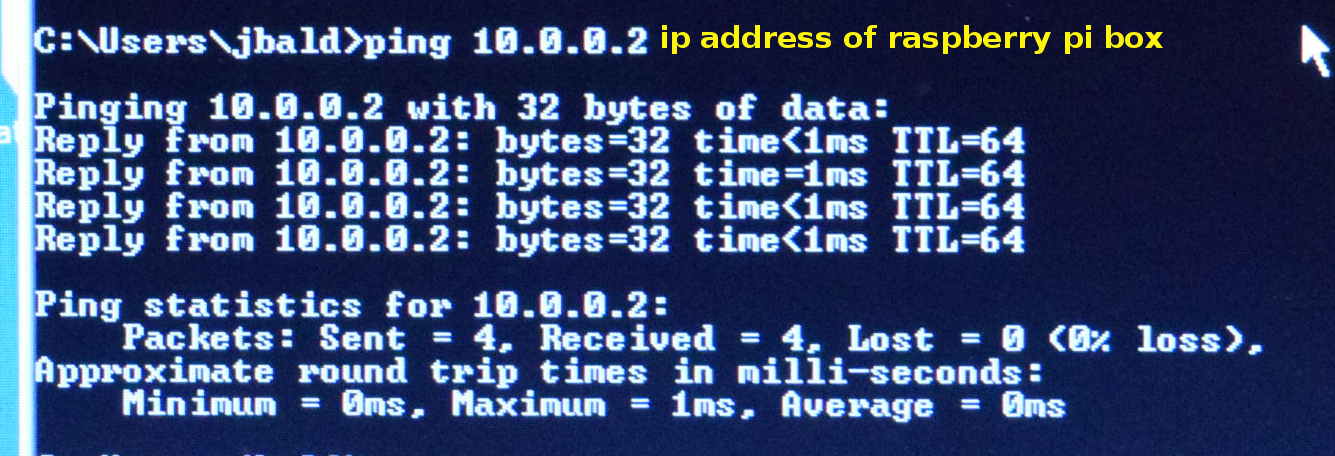
- With your two computers connected to the same network you can use the ping command on either computer followed by the IP address of any other computer to see if the two systems can route packets to and from one another. Use the figures below to help you and record how long the packets took to reach the other system on your response sheet.
Pinging the windows box on the pi